• working on DNS.. links may break temporarily.
I really want to do it to see if I would have a flash fire when I opened the box and all that melted fat on embers got a rush of oxygen. LOL
 
no the paint is only avail in matte black ive used it to repaint home depot special char broil offset and 2 other pits, works great. make sure you scuff surface and get loose stuff and or rust off and give it 3-4 coats 1 hour apart on a 60 degree or better day.
i have a heated garage in my sign shop so i paint all year
 
We were planning on going glossy all the way around...with that kind of price...we may have to change our minds...

We're hoping we can get everything assembled and burned out by this weekend or next.. We are wanting to give it a go before we get it lookin all pretty.

Before too long, we'll have the framing done for the storage also..
 
Okay..So the women made us cut out day short (not much long after it started). One of us got drug around the mall and the other had to clean out his garage and rearrange EVERYTHING... We didn't get as far as we wanted but had to make sure you got fed a little for the weekend..We may have some mid-week progress to report until our next full weekend..We'll see.

This first shot is a close-up of the firebox door. You can probably guess which style we plan to go with for the inlets. The door looks a little rough around the edges, but we'll get it prettied up by the time it is finished.

FBLid.jpg


This is just a shot of the stainless steel table top we are using for the business end of the chamber.

StainlessShelf.jpg


The next two pics are views of the inside where the box outlet meets the chamber. On the first pic, you can see that we are planning on placing the flanges on the inside of the chamber for a smooth, clean look (they aren't fastened yet). In the second pic, you can see that the chamber hole was cut larger than it needed to be; this was done to give us space to lay some welds down around the perimeter.

InsideChamber01.jpg

InsideChamber02.jpg


View from the left side.

BackChamber01.jpg


Top shot.

TopSmoker01.jpg


The next two are just angle shots.

Angle02.jpg

Angle01.jpg


Dad next to the trailer for another size comparison.

DadSmoker01.jpg


There you have it guys. We'll try to get some more knocked out as soon as possible!
 
I agree that it seems like it sit's to high. Mayne it'll make sense once it's explained? I do think that the fire box is really big for a chamber that size...especially considering it's insulated. Maybe the explanation of the height of the inlet will explain both?
 
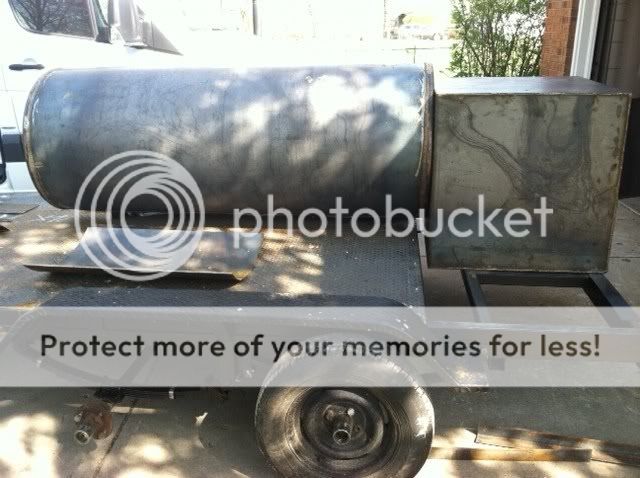
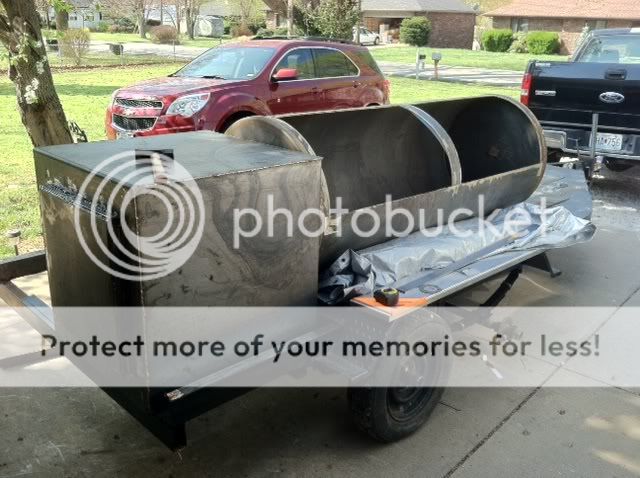
Well, the firebox should've been about a 24" cube (according to the calculators); this one is 26" cubed. It is a bit bigger than called for, but it won't have a negative impact on performance.

EDIT: the recommendations say the firebox should be 1/3 of the chamber. If you think about it, our chamber is 72" long and 28" in diameter. The 26" cubed box is more or less 1/3. If it's bigger, it's a mundane amount. It's about perfect..basically rounded up.

This is a Jambo clone..which is why the bottom of the hole was cut at about the "equator". If you have the chance to look inside a Jambo (some of the Jambo owners may be able to lend a hand here), you'll notice that this hole is above the main level grate (which is about halfway up the chamber). There is a baffle of sort directing the heat. The position of the smokestack will draw the heat back down by the time it reaches the far end of the chamber creating an arch. This arch will be somewhat minimal, which helps to eliminate the hot spots across the chamber. It's "unorthodox" but it seems to work well. The smokestack outlet will basically be flush with the main level grate also (the bottom of this opening will start about 1.5-2" below the main level).

The placements of the inlets/outlets are virtually identical to that of the Jambo. From what I have seen, our firebox is actually insulated just a tad bit better, too.
 
Last edited:
See...thought the explanation would make sense and explain both questions!!! It does seem like a big fire box though. Must be the extra steel to encase the insulation.
 
Yeah. it's thick steel with a 2" gap. That's about 2.5" deep from the inside of the inner box.

Here are a few more updates:

The first three are shots of the table. Constructed the frame. Added it to chamber. Placed stainless top on frame. We'll either remove it before painting or wrap it. On the last pic, you can see the stainless flanges on the inside of the chamber.

Stainlesstable01.jpg

Chambertable03.jpg

Chambertable02.jpg


This is a quick shot of the smokestack hole. 6x6.

Smokestackhole.jpg


The next two are shots of the grease trap/valve. We have this coming down through the bottom of the trailer.. keeping it out of site.

Greasetrap.jpg

Greasevalve.jpg


This last one is a shot of the whole rig..Man...it's starting to take shape more and more.. I'm getting excited. We'll probably be cooking out of this bad boy in a weekend or two.

Rig01.jpg
 
That's a great looking build. I too have some concerns about the height of the firebox hole, I think I would put the exhaust on the same end as the firebox and direct the smoke down underneath and distribute it with tuning plates. JB
 
That's a great looking build. I too have some concerns about the height of the firebox hole, I think I would put the exhaust on the same end as the firebox and direct the smoke down underneath and distribute it with tuning plates. JB

Thank you, thank you.

The firebox outlet won't be an issue. It was placed at that level for a specific purpose. The exhaust is already cut, so this would be problem one. The second problem with making a rf with this build is the height; as you can see, if we tried to do this, we would run out of room. The tuning plates, cooking surface and exhaust would all have to fit above the firebox outlet for that to work. We didn't want a rf build. The layout we chose will disperse heat evenly across the entire cooking surface. We paid a lot of attention to the science that goes with building an efficient smoker. One of these days we'll have results to share!
 
TWSSB, it looks great. We need to get you some rolling stock underneath her though. You don't want to be stuck on the side of the road this summer with this rig! I am guessing you are going to be pushing 2400lbs right now. Interesting to see how the weight comes out. I wish I could have found a dual axle bunk like you scored there. Its really coming out nice!!:thumb::thumb::thumb:
 
Looks great brother. I'm curious as well to see how that firebox exit performs being so high. Never seen or used a jambo so I'm in the dark on this one. Off the top of my head it seems that the top racks would end up being a lot hotter than the bottom racks. Well more so than normal I guess. Quite interested in this design. Great build so far. That firebox design is intense!!! :heh:

Cheers
 
Back
Top