• working on DNS.. links may break temporarily.

First UDS Build

Well, I wasn't able to pick up my drum today so I figured I would still try to be productive.

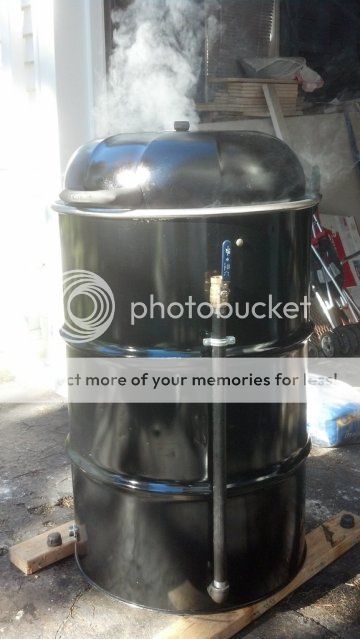
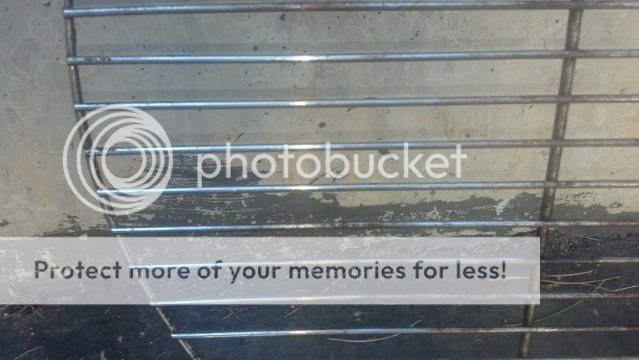
I clean up the soon to be lid of my UDS and cut the base ring off just in case I need it to properly fit the lid to drum. I cut up my shopping cart charcoal basket and prepared it for treating to remove the powder coating and then it's off to be welded. I also soaking my cooking grate in a vinegar and baking soda solution in hopes to salvage it for a few smoke outs.

Here are a few pics

2012-09-13_15-48-46_599.jpg


2012-09-13_15-49-32_212.jpg


2012-09-13_15-49-01_527.jpg


Dana
 
I also soaking my cooking grate in a vinegar and baking soda solution in hopes to salvage it for a few smoke outs.

How well does the vinegar & baking soda work on filthy grills? I've got some cast iron grates from our kitchen stove that I currently use nasty stuff on a few times a year to clean -- would this work better with less effort? Hmm..
 
How well does the vinegar & baking soda work on filthy grills? I've got some cast iron grates from our kitchen stove that I currently use nasty stuff on a few times a year to clean -- would this work better with less effort? Hmm..

Honestly, I'm not too sure how great this method will be but it was one of the recipe I came across while searching methods to clean BBQ grates. I'll know more tomorrow once I give them a scrub down and rinsing. Right I have then in a trash bag on the floor in the garage in the vinegar solution.

D
 
Vinegar and Baking Soda Method

Here are the steps I followed... quick and simple.

Deep Cleaning with Vinegar


  1. Place the grates in a large plastic bag, such as a garbage bag.
  2. In a plastic of metal dish stir together one cup of vinegar and half a cup of baking soda.
  3. Pour this solution on the racks.
  4. Close the bag and leave it overnight.
  5. Rinse the gunk, which should now be loosened, off in the kitchen sink or with the garden hose.
 
Results from the overnight vinegar soak are in....

This grate seemed to be aged for a few good years and was layered with what appeared to be years of cheap hamburger.

But, now we are almost ready to use.

2012-09-14_09-09-10_644.jpg


2012-09-14_09-09-28_53.jpg


I used appx. 3 cups of vinegar and 1 box of baking soda. I soaked the grate for about 15 hours and then quick scrubbed with a grill brush then rinsed with garden hose.

I will clean again with a Scotch Brite pad before installing into the UDS.

D
 
Picked up my drum this morning. Wow... is this thing clean and unlined so no sanding or burning needed. :clap2:

2012-09-14_10-24-42_589.jpg


2012-09-14_10-24-52_829.jpg


2012-09-14_10-25-52_731.jpg


Off to the car wash this afternoon!!!

D
 
How well does the vinegar & baking soda work on filthy grills? I've got some cast iron grates from our kitchen stove that I currently use nasty stuff on a few times a year to clean -- would this work better with less effort? Hmm..
I put my cast iron grates in the oven and run a self clean cycle. :thumb:
 
Another problem...

My lid is too small for my drum. There is about a 1/4 gap all around the lid when holding over the drum even if I was to use the bottom ring from the charcoal cooker it doesn't fit. I was thinking about using the original cover of the drum and then customizing it to fit my lid by riveting the two of them together after I cut the center out of the cover.

Any thoughts? Good bad and "ugly"?
 
flip the drum and see if the lid fits the bottom.

I guess I never thought there would be a difference. What would you do to secure the top cover which is only held on with a spring clamp? Plus, there are plastic caps on the top cover holes.

D
 
flip the drum and see if the lid fits the bottom.

Well, I tried that but still no luck as the bottom rim is still too large for the lid to fit. Still looking like a 1/4" variance. I have a plan though so I'll have to post some pics when complete.

D
 
Lid Modification

Well, Here are some of the first step in my build.

I am modifying the cover of the drum to fit my domed lids from the charcoal grill. I wanted to leave the original rim from the cover to give solid support and a nice fit on the top of the drum so I figured I would just cut the center out of the cover and then fit the domed lid onto that so things will fit snug and function well. Here's some pics....

photobucket-73023-1348155928506_zps55a5050e.jpg


photobucket-6602-1348155925773_zps2c341bd7.jpg


photobucket-13286-1348155929400_zps7985602c.jpg


photobucket-76648-1348155922122_zps26637aae.jpg


photobucket-43814-1348155923977_zpsee7c3dbd.jpg


photobucket-68950-1348155923053_zps3cd9a53e.jpg


photobucket-6604-1348155927617_zps1961a1f5.jpg


photobucket-44399-1348155924870_zpsed3d3589.jpg


photobucket-54344-1348155930282_zps655fbc1c.jpg


Next...

Drilling and installing vent holes. Mores pics to come soon!

D
 
Nice work on the circle cutting jig or fixture for the grinder :). Curious to see how the lid works out, do you have a spare unmodified flat lid ??
 
Nice work on the circle cutting jig or fixture for the grinder :). Curious to see how the lid works out, do you have a spare unmodified flat lid ??

No extra lids on hands but the guy i got the drum from has 8 storage trailers full of them. I don't see it being a problem to get another if needed.

As for the jig it is something i use for cutting cover off beer keg for home brewing. Works great every time.

D
 
Last edited by a moderator:
No extra lids on hands but the guy i got the drum from has 8 storage trailers full of them. I don't see it being a problem to get another if needed.

As for the jig it is something i use for cutting cover off beer keg for home brewing. Works great every time.

D

The reason I asked, is that all my tries so far with a domed lid ended up with runaway heat. I have not tried a gasket with a weber lid yet, that is the next thing I try. I know people DO use them, and yours looks like it seals up well. I have not yet NEEDED a domed lid, but I'd like to do a whole turkey, and it might be nice for that :).

Bill
 
Hardware was soaked in vinegar for 48 hours and things look goods to go. Here is a treated and untreated zinc bolt. Time to finish the basket.

photobucket-13580-1348328481478_zps17d7bee9.jpg


D
 
Here are some more build pictures. Officially ready for smoke :clap2:

photobucket-29353-1348433825996_zps00de9360.jpg


photobucket-66813-1348433829548_zpsdb3950ac.jpg


photobucket-74102-1348433828647_zpsa4b53063.jpg


photobucket-39436-1348433827749_zps92f2ecfe.jpg


photobucket-53077-1348433826836_zps2f6867aa.jpg


photobucket-39494-1348433830486_zpsdab1464e.jpg


photobucket-31988-1348433825048_zps7da0c146.jpg


Here is whats cooking..

photobucket-74151-1348433824144_zps1c849df0.jpg


D
 
Back
Top