New Guy, Modding New Pitmaker Safe

Davey D

Well-known member
Joined
Mar 26, 2013
Messages
16
Reaction score
1
Points
0
Location
Pacifica...
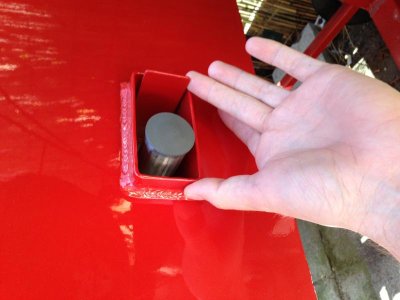
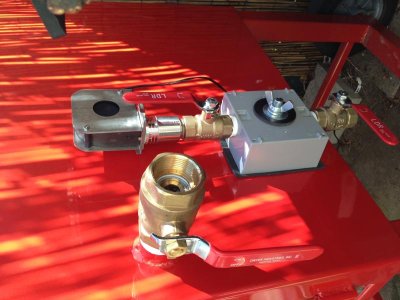
Hey Brethrens, I'm new to the forums; I'm glad to be here. I recently acquired a new Pitmaker Safe. It seems to be a very well built unit. However, I am not thrilled with the slide-style damper. Although I did not have too much of a problem with temperature spikes, I would prefer something more precise. Since I am a novice welder at best I don't want to attempt to do anything permanent to the pit itself. And since I am already in the poorhouse after purchasing this pit, I would like to keep costs down for this mod. Any suggestions on attaching a more precise ball-valve damper for minimal costs would be appreciated. Thanks in advance! Glad to be a part of this forum!
 
Get a piece of plate it needs to be slightly larger than the intake opening and some Angle iron 1" will work. and a 2" nipple and a 2" ball valve, and 2 bolts long enough to extend into the pit by 2"
cut the hole and weld the nipple to the middle of the plate make a flange that will fit snug in the opening and weld it to the plate. weld a bolt on each side of the hole cut a piece of A/I that will extend 1" to either side of the intake opening mark and drill the holes for the bolts to attach through. Apply a bead of High temp RTV at the joint of the flange and the plate and install it. let it sit 24 hrs to cure the RTV.
 
For $200 and well worth it, you shoulda just upgraded to the ball valve control with the 1 1/4 and 3/4 ball valve. The slide valves are known For leaking a little air. You can get a hammer and tap the slider rails to tighten up the slides.
 
I ordered a Pitmaker Safe last month and thanks to the guys on this site, I ordered it with the ball valve controls for that very reason.
 
Thanks for the advice. I did happen to order it with the ball valve upgrade however they made a mistake and made me one with the standard slide. I would have had to wait another 6 weeks so I took it as is at a discount. I am kicking myself now unfortunately. Making the best out of the situation I think I have a solution for under $50 and no welding. I will post pictures shortly.
 
I went to the hardware store and came up with an airtight plan. I got a metal conduit box, ball valves, and a long bolt with a wing nut. I had a piece of angle iron so I used a small piece to hold the bolt from the inside of the firebox. I am in the process of testing it now. I included a pic of before with the bbq guru adapter Pitmaker supplied, and after.
 

Attachments

  • before.jpg
    before.jpg
    41.8 KB · Views: 195
  • after.jpg
    after.jpg
    58.5 KB · Views: 194
Ingenius, and it looks pretty cool
 
Thanks for the feedback! So far it is working perfect. I will keep you updated as far as how efficient and how well it maintains temp.
 
Nice mod! You will still have to tinker with the gate valve a little here and there.
I run It wide open when I add meat till I reach my set temp, then drop the gate valve back to 1/4 and it overshoots a few degrees and settles in nicely. I'm different than most on the vaults. I preheat to 400, I fill the charcoal basket up with lump and never have to worry about refueling. If you wanted to do the snake method, just stand up 2 firebricks and pour your coals around them, light one end.
 
Back
Top