King
Full Fledged Farker
Here is another tutorial for all the new brethren here. Most elders on this board swear by this method and I have come to use it as my method of choice for grilling yardbird.
This may not be the only or best way to spatchcock a chicken, but fellow brethrens are free to add their own tweaks and caveats about grilling whole chicken with this method.
Spatchcock Chicken

Adapted from Amanda Gold
Grilling the whole chicken is becoming extremely popular lately. Cooking it whole has a big advantage over chicken pieces; it prevents the pieces from drying out.
Rotisserie and beer can chicken (BCC) are a couple of methods used to cook whole chicken. The rotisserie style rotates the yardbird to cook evenly and directly over the fire. Beer can chicken uses fluids to create moisture and protect the chicken from drying out while adding flavor at the same time.
However, you do need to rotate your chicken when you use the BCC method depending where your heat source is. In addition, you may not need to use the extra moisture because the chicken you buy at the grocery store, like Tyson or Purdue, already contain a brine solution to prevent overcooking.
Unfortunately, I don’t own a rotisserie device or a BCC stand. So my solution is to spatchcock the chicken. In the spatchcock method, you don’t need a special device to cook the chicken. Instead, it is laid flat on the grill with the breast plate and cavity used as a buffer between the heat and meat. The chicken skin would also protect the top of the chicken and let the fat melt all over the succulent white flesh.
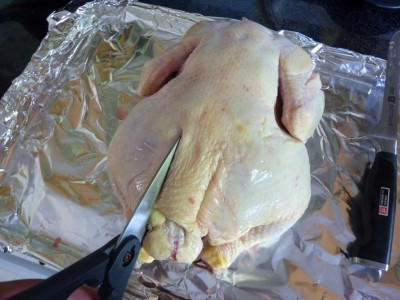
1. Start by placing the chicken breast-side down on a cutting board.

2. Use kitchen/poultry shears to cut from the tail end along either side of the backbone to remove (You will need to use some force to do this as you are cutting through flesh and small bones).


3. Open up the chicken to view the inside of the breast cavity. Down the center of the chicken is a small bone called the keel bone and cartilage that extends along the breast meat. They are both covered by a opaque white membrane.

4. Take a sharp knife and cut the membrane along the center of the chicken to expose the keel bone and cartilage.
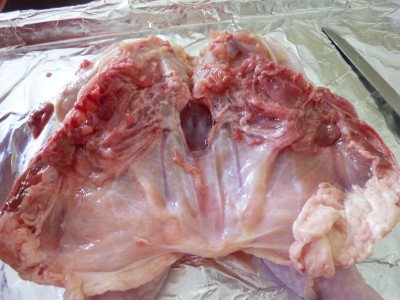
5. Use your fingers to pull out the keel bone. This may be difficult to remove. Another way is to fold the chicken like a book towards the cutting board. Try to remove the cartilage as best as you can, however, I sometimes leave it in.

6. Flip the chicken over, see how it now lays flat on the board. You are now ready to apply your favorite yardbird recipe.

Note: Cut the tips of the chicken wings off, they just burn and that part has no meat anyways.

Seasoning the bird
Just like when you cook chicken over rotisserie or using the beer can method, make sure to season underneath the skin too.
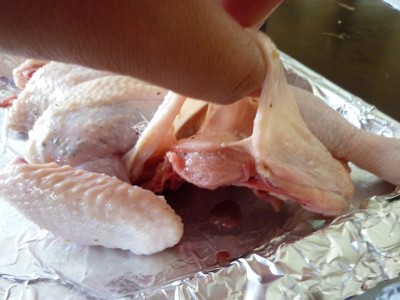
1. Lift the flap of skin around the neck to access the breast meat.

2. Access the thigh and legs by lifting the skin below the wing on both sides.
3. Also season the cavity of the chicken.

4. Finally, apply rub onto the skin.

On the Grill
1. Set up the 2-zone grill method or smoke it.
2. Place the chicken with legs and thighs closest to the heat to keep the breast meat away from the radiant heat. Put the lid on.

Tips:
1. Done temps: Breast – 155 degrees, Legs, thighs and wings – 165 degrees. Watch the white meat closely, it is leaner, so it will cook faster
2. Brine the chicken to prevent drying out the meat and to give additional flavor.
3. Cooking chamber temps should be from 325 to 375 degrees.
4. Crisp up that chicken skin by cooking it over direct heat in the last few minutes before it’s done.
5. Let the chicken rest for 10 minutes so the juices settle then serve.


This may not be the only or best way to spatchcock a chicken, but fellow brethrens are free to add their own tweaks and caveats about grilling whole chicken with this method.
Spatchcock Chicken
Adapted from Amanda Gold
Grilling the whole chicken is becoming extremely popular lately. Cooking it whole has a big advantage over chicken pieces; it prevents the pieces from drying out.
Rotisserie and beer can chicken (BCC) are a couple of methods used to cook whole chicken. The rotisserie style rotates the yardbird to cook evenly and directly over the fire. Beer can chicken uses fluids to create moisture and protect the chicken from drying out while adding flavor at the same time.
However, you do need to rotate your chicken when you use the BCC method depending where your heat source is. In addition, you may not need to use the extra moisture because the chicken you buy at the grocery store, like Tyson or Purdue, already contain a brine solution to prevent overcooking.
Unfortunately, I don’t own a rotisserie device or a BCC stand. So my solution is to spatchcock the chicken. In the spatchcock method, you don’t need a special device to cook the chicken. Instead, it is laid flat on the grill with the breast plate and cavity used as a buffer between the heat and meat. The chicken skin would also protect the top of the chicken and let the fat melt all over the succulent white flesh.
1. Start by placing the chicken breast-side down on a cutting board.
2. Use kitchen/poultry shears to cut from the tail end along either side of the backbone to remove (You will need to use some force to do this as you are cutting through flesh and small bones).
3. Open up the chicken to view the inside of the breast cavity. Down the center of the chicken is a small bone called the keel bone and cartilage that extends along the breast meat. They are both covered by a opaque white membrane.
4. Take a sharp knife and cut the membrane along the center of the chicken to expose the keel bone and cartilage.
5. Use your fingers to pull out the keel bone. This may be difficult to remove. Another way is to fold the chicken like a book towards the cutting board. Try to remove the cartilage as best as you can, however, I sometimes leave it in.
6. Flip the chicken over, see how it now lays flat on the board. You are now ready to apply your favorite yardbird recipe.
Note: Cut the tips of the chicken wings off, they just burn and that part has no meat anyways.
Seasoning the bird
Just like when you cook chicken over rotisserie or using the beer can method, make sure to season underneath the skin too.
1. Lift the flap of skin around the neck to access the breast meat.
2. Access the thigh and legs by lifting the skin below the wing on both sides.
3. Also season the cavity of the chicken.
4. Finally, apply rub onto the skin.
On the Grill
1. Set up the 2-zone grill method or smoke it.
2. Place the chicken with legs and thighs closest to the heat to keep the breast meat away from the radiant heat. Put the lid on.
Tips:
1. Done temps: Breast – 155 degrees, Legs, thighs and wings – 165 degrees. Watch the white meat closely, it is leaner, so it will cook faster
2. Brine the chicken to prevent drying out the meat and to give additional flavor.
3. Cooking chamber temps should be from 325 to 375 degrees.
4. Crisp up that chicken skin by cooking it over direct heat in the last few minutes before it’s done.
5. Let the chicken rest for 10 minutes so the juices settle then serve.


