You are using an out of date browser. It may not display this or other websites correctly.
You should upgrade or use an alternative browser.
You should upgrade or use an alternative browser.
BBQ Tamales?
- Thread starter Plowboy
- Start date
FatDaddy
is Blowin Smoke!
ThirdEye makes alot of tamales i think . im sure he will chime in soon. I havent yet they look like alot of work but my fiance and her grandmother make a ton over the holidays. may give em a porkshoulder to turn into tamales for me. bet they would be tasty.
smokinbadger
Full Fledged Farker
I haven't made tamales with it, but I frequently use my pulled pork for quesadillas, which I toast on the grill. You can't go too wrong with pulled pork in anything in my opinion.
Norcoredneck
somebody shut me the fark up.
Patiently waiting for Thirdeye secret recipe. :icon_shy
Kevin
Quintessential Chatty Farker
Yes. Thanks to Elkhound, TK, Big Dog and many others for the input on the following most excellent threads, recipes, and TK's pictorial. May be a road map candidate?
http://www.bbq-brethren.com/forum/showthread.php?t=14622&highlight=tamales
http://www.bbq-brethren.com/forum/showthread.php?t=14996&highlight=tamales
http://www.bbq-brethren.com/cookbook/viewrecipe.php?id=1135640599&category=Mexican
http://www.bandera-brethren.com/mod...lery&file=index&include=view_album.php&page=1
Bigdog
somebody shut me the fark up.
Yes. I used a smoked butt last year and it came out great.Plowboy said:Thinking about doing some tamales this fall. Anyone use their smoked pulled pork for tamales? How about you NM guys? Man, I sure miss the carne adovada down there.
And big thanks to Kevin for putting all those fine tamale threads together. I agree that it belongs in the road map area. Lots of great tamale makers on this site. I need to take some pics of our tamale party this year. They are a blast.


Pulled pork is the perfect texture for tamale filling. You can actually under-cook it a little because of the simmering seasoning and reducing you do when preparing the filling. If you are going to barbecue some specifically for tamales, salt and pepper are about the only seasonings you need, again since other seasonings are added and adjusted while you make the filling. I also tend to wrap mine in foil about 170°, or if the bark is getting too dark, and finish that way. After pulling I add ALL of the foil drippings to the freezer bags.
Pressure cooking a butt or some country ribs works well also because you get fresh broth to use. This only takes 45 minutes, so if you are short on your supply of PP in the freezer, you can make up the meat needed quickly.
The TK "How-To" is EXCELLENT and doesn't miss a single step. I prefer to use the prepared masa (fresh and with lard added), but can only buy the good quality stuff down in Denver. Using it will shorten the learning curve. It freezes well for up to 6 months (I guess because of the lard). If you can't find the fresh, the dry mix will work fine.
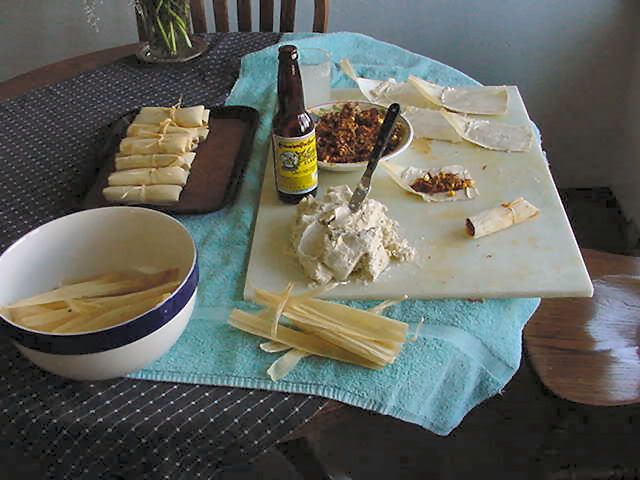
Here is how I do them. Maybe you'll find a small tip you can use. This was clipped from my cookin' site.
_______________
HUSKS
Bags of dried corn husks are available in most markets in the Mexican food section. They need to be soaked in warm water for about an hour, separated and rinsed clean of any dried silks, and kept moist for rolling in a dishpan.
FILLING
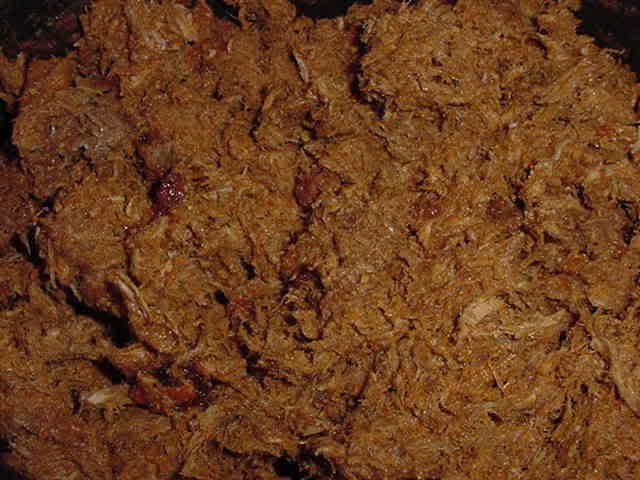
Three ground chili powders (with no other spices added) and one chili powder blend are used to get a traditional flavor footprint that is sweet, smokey and hot. The total amount of the chili powder is 1 cup + 2 tablespoons. Ground chili peppers and blends can be found at www.penderys.com if you can’t find some local substitutes. The filling must be quite robust because the steaming and the masa will buffer the flavor and the heat factor a little.
7 or 8 pounds of pulled pork butt (medium to fine shreds).
¼ cup Chimayo chili powder
¼ cup Tularosa chili powder
2 tablespoons Mulato chili powder
½ cup Top Hat chili powder blend
¼ cup cumin
1-1/2 tablespoons crushed tepin peppers.
1 tablespoon Mexican oregano
2 tablespoons salt
6 tablespoons fresh garlic, chopped
1 tablespoon garlic powder.
Chicken broth & water - about 4 cups total
Place the pulled pork in a large Dutch oven or roaster. Add all of the ingredients except the broth and water, mix in well. Add about half of the broth and water, mixing in well. Bring this mixture to a simmer in order to reduce the liquid, stirring occasionally. Add more liquid at least once more and continue to reduce until the filling is just a little soupy, then set aside to cool. Once the mixture has begun the first reduction, the Dutch oven can be transferred to your cooker, at around 275° grate temperature, to receive a little smoke flavor during the final stages of the reduction.
MASA
Masa is basically made by beating ground corn flour into lard, forming a dough. Buying fresh prepared masa from a Mexican grocer or tortilla shop is preferred. If fresh is not available, dry masa mixes are available in the Mexican food section of most supermarkets. Don’t forget to pickup some lard.
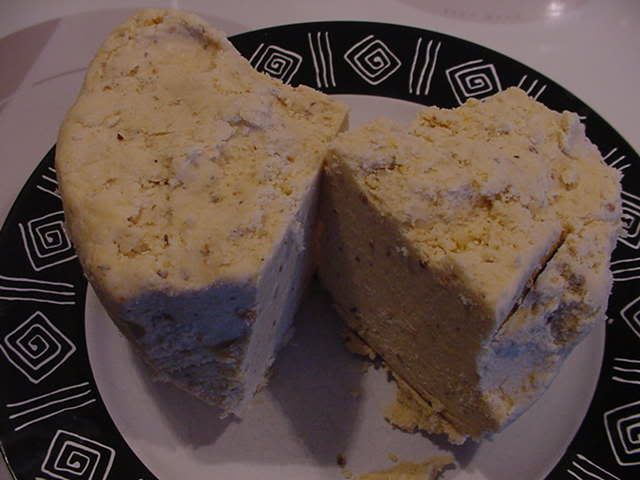
Fresh masa keeps in the refrigerator for a few days and also freezes well, it comes in 1 or 5 pound blocks. Add warm water or broth and work into a dough with a spongy texture. For the mixes, follow the directions on the bag. The dough needs to be spreadable and can be moistened during the assembly if it becomes too stiff.
ASSEMBLY
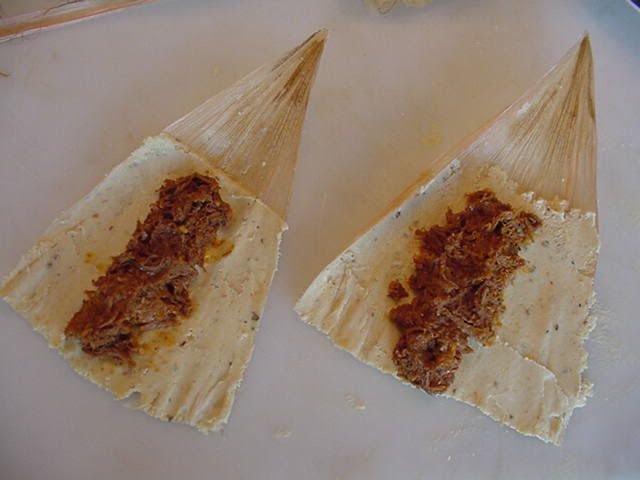
Everyone has a different masa spreading technique and have a favorite tool. I like a triangular shaped pie serving utensil. A wide putty knife or small triangle trowel works well too. It is best to have an assembly line with one person spreading and another filling and rolling. I like to use a big cutting board for the assembly. And work at the kitchen table. A glass of warm water is handy for dunking the spreading tool.
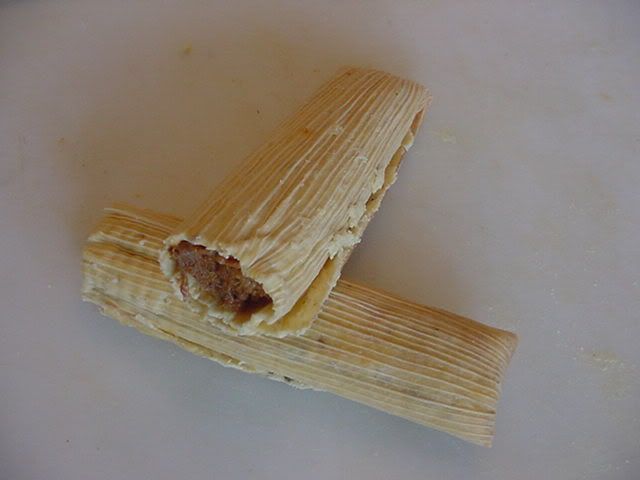
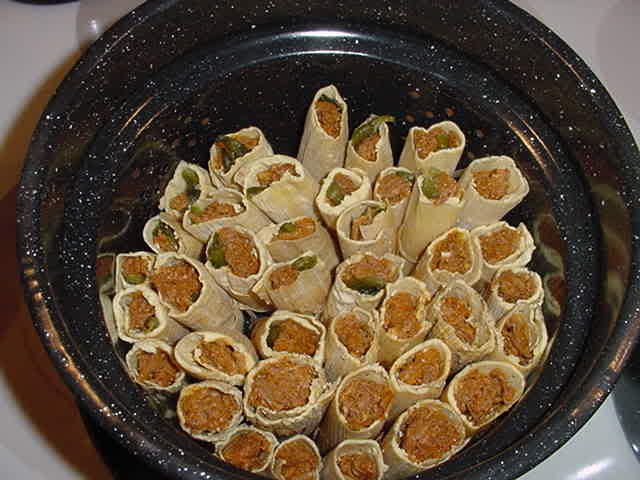
Remove a few husks from the dishpan and shake off any water. Tear them so that they are about five fingers wide. Husks have a coarse side and a smoother side. Lay one husk on the work surface and spread about 2 tablespoons of masa onto the smooth side of the husk forming a thin even layer. (TIP: A sprinkle of chili powder can be added to the masa before adding the filling). Add about one fingers width of filling onto the masa and roll the tamale closed, then fold the narrow end down. These can be tied with strips of husk or stacked on a tray with the fold down.
My steamer holds about 30 to 40 tamales. Lay the steamer insert on its side and stack the tamales in, open end up. Tied tamales are easier to load and remove from the steamer. Tip: If you are making a small batch, stack in a few rows, put an empty quart Mason canning jar in the center and continue to stack around the jar. Before steaming, put a few inches of water in the Mason jar.
Place a dish towel over the pot and loosely cover with the lid. This stops condensation from forming on the lid and raining on the tamales. Keep the water at a low boil.
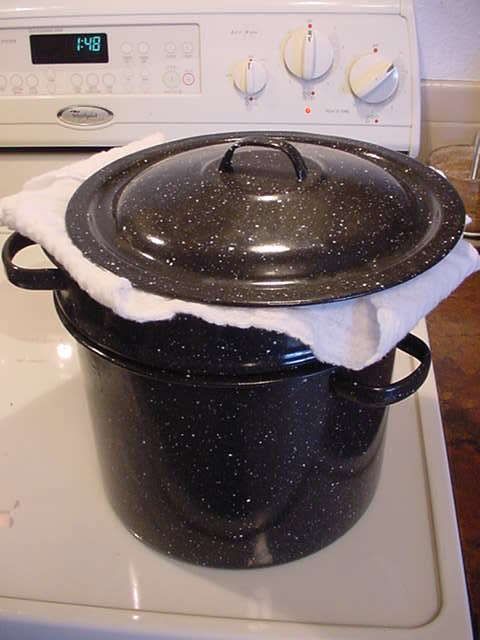
After 45 minutes, sneak a tamale out of the pot and let it cool for three or four minutes. The tamale should separate from the husk and unroll easily (thanks to the lard in the masa). The texture of a properly steamed tamale should be soft but firm. Chances are, the sampler won’t quite be done, but it is a necessary test so you don’t overcook them. Every ten minutes or so check another. For the size I make, a full steamer takes around an hour to be ready.
To reheat, wrap a few tamales in a damp paper towel, an outer wrap of wax paper is also helpful, and microwave.
Kevin
Quintessential Chatty Farker
Bigmista said:*drooling*
I was just telling MrsMista that I need to learn how to make tamales. Guess I shoulda known that I could learn it here.
Hey Mista, we have a lot of fun throwing tamale making parties. Cook the filling up ahead of time. Gather all of the other ingredients and invite some friends that like to cook. Corona is required (for the tamale makers).
jpw23
Babbling Farker
Kevin said:Corona is required (for the tamale makers).
Can you substitute DosXX?
B
bbqjoe
Guest
No wonder my tamales always came out sota funky. Great "how to" Thirdeye!!
Kevin
Quintessential Chatty Farker
jpw23 said:Can you substitute DosXX?
Never tried it. I will now.
Plowboy
somebody shut me the fark up.
Gee, this thread is a keeper! Appreciate all of the write ups and links. I feel a lot less intimidated about attempting my first tamale making. I'm afraid that I'll want to do it over and over, experimenting like my BBQ. Like, I've got time for that! Too bad I love tamales.
Norcoredneck
somebody shut me the fark up.
Thanks for the play by play.
Similar threads
- Replies
- 18
- Views
- 1K