• working on DNS.. links may break temporarily.
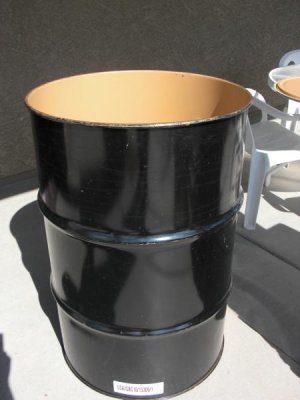
Very Simple Stainless UDS

First, my thanks to all the great contributions of the Brethren and Sistren in the UDS Thread. My goal was to use best ideas I saw to produce a very simple stainless UDS.

This has a Weber Performer Lid with the built-in thermostat and the stainless draft door from Big Green Egg.

SSUDS.jpg


Removable lid seal insert made from old Bar-B-Kettle bottom cut to leave 2" w/ Rutland stove gasket attached to it with high-temp silicon.

RemovableLidSeal.jpg


(Trial run last night was a 14 lb brisket packer, cooked at 300 degrees until probe tender in 5 1/2 hours. Outdoor temperature was low 20's w/ snow showers. Cooked it Lockhart style with outstanding results -- thank you Funk for all the great info you have shared.)

I am going to add handles, but not much more. I like the simplicity.
 
advise needed on first use of UDS

Thanks for all the great cooments and directions for building a UDS.

I just finished my UDS using the following plans:
- burned out barrel and wire brushed it clean.
- used flat top for lid with 2" bung hole for outlet vent.
- made 8"h x 13.5"d charcoal basket with 3/4" expanded metal and 13.5" Weber grate on 3.5" bolts for legs. Also have alum pizza pan for ash pan.
- Three 3/4" close pipe nipples for air inlets 2" off bottom. (2 with caps and one with 3/4" ball valve)
- 22.5" Weber meat grate set 24" above charcoal basket (27" off bottom). Have thermometer 1" below meat grate.

I used Kingsford briquets for my cooking trial run of pork spare ribs. I lit about 1/4 of a chimney and set it in a coffe can to the edge of the basket loaded with about 10 lbs of briquets.
With all inlets open, the UDS came up to 250F fairly easily for the run. Then I capped 2 inlets and tried to control with the valve only. I had to keep opening and capping one inlet to control between 230 to 270F. It didn't seem to be stable, either too hot or too cool. Then eventually it wanted to died out. So I opened the second small (about 1") bung hole in the top and the UDS seemed to draft better. I was able to get control at 230 - 250F with only the inlet valve.
The only problem (I think?) I have now is that the fire wants to choke out with ash build-up. I had to shake the drum too often it seemed (every hour) or open it and rack the coals around to drop some ash.
Overall I was please with the results but don't really see it being able to run 8 - 10 hrs almost unattended like I here some people are doing.

Any suggestions on helping my ash build up problem would be appreciated or any mods I need to make to the design that may help.
 
New to this and landed my first drum.

I had read 330+ pages and i am on information overload. This leads me to a few questions that i sill am not sure about because i cant remember what was said within the 330 pages of readings.

1. My top has two holes in it already one about 2 1/2 inches and one about 1 1/2 inches. Should i just use one of these for the top vent, or should i drill the 6 to 8 smaller holes in the top.Why do some drill all these holes? I am brand new to smoking so i would like to do the one that is easier to control temps/user friendly

2. People talk about expanded metal alot in this forum but i am stll not sure what is ment by this. (please dont bash me, i really am unsure)
 

Attachments

  • CIMG0001.jpg
    CIMG0001.jpg
    27.3 KB · Views: 931
  • CIMG0002.jpg
    CIMG0002.jpg
    40 KB · Views: 927
  • CIMG0003.jpg
    CIMG0003.jpg
    25.9 KB · Views: 927
Last edited:
@ Stiffy You don't think these drums are to thick for those knock out punches to cut. I thought that the drums were 18 gauge and the max for the knock out punches [FONT=arial, sans-serif]10 gauge mild steel, aluminum, fiberglass and plastic. Did you use the knock out punches.
[/FONT]

No hadn't used them, merely saw them, and thanks to NorcoRedneck I didn't buy them .... :rolleyes: Really thanks, woulda been a bad deal to find out they were all just a little too big for my needs, and would have been a dumb buy.
 
Weather let up a little . I went out to shed to check for a 1" hole saw. All my hole saws were hammered, so I went to town and bought one of the rigid that norco had links to. I have all the parts now just waiting for weather to clear up so that I can start assembly.
 
New to this and landed my first drum.

I had read 330+ pages and i am on information overload. This leads me to a few questions that i sill am not sure about because i cant remember what was said within the 330 pages of readings.

1. My top has two holes in it already one about 2 1/2 inches and one about 1 1/2 inches. Should i just use one of these for the top vent, or should i drill the 6 to 8 smaller holes in the top.Why do some drill all these holes? I am brand new to smoking so i would like to do the one that is easier to control temps/user friendly

2. People talk about expanded metal alot in this forum but i am stll not sure what is ment by this. (please dont bash me, i really am unsure)

Expando or Expanded metal. I had no clue what it was either when I joined up. At least not by name.
http://expandedmesh.cn/index.html
Lots of people use it to biuld the coal baskets. They buy a long sheet and then roll it and secure the ends with bolts to make the basket. Or like I did, cut it up into plates and weld them together.

Your drum has the bungs on the lid so you can just use those. Some guys get threaded pipe and screw it into the larger hole and make a smoke stack. Most that drill all those holes do so because the lid they have doesn't have the bungs so they create their own exhaust.

Nice drum.
 
The smaller one usually has a steel plug in it as well. If it's threaded, you might want to take the lid to the store with you so that you can test fit the threaded pipe. If the smaller bung has no steel cap and is not threaded, you can always use that smaller hole to run therm wires through etc. And at worst maybe plug it with a cork if it doesn't have a steel plug and is not threaded.
 
Lastly, you lid will have a white, plastic seal all around the bottom of the lid that you will want to remove. That plastic seal can melt and burn up once you get the drum going. After it's removed, the lid will still sit just fine, you will just have metal to metal contact. I don't know if anyone has ever left it on and never had problems with it melting, but I removed it from both of my lids.
Can't wait to see it.

Dudz--I'm going to work on a baffle system like you had mentioned that will be suspended over the basket. I'm curious to see how it would work.
 
Haha yea its a plastic cap on the metal plug, the larger one had a plastic cap on it as well. I ripped that one off cause i wanted to see what was under the plastic. The smaller one is the same, i just ran outside and ripped it off hahaha. I donnt know how i am going to get the metal cap off. that thing is SO stuck. if anyone knows a good way to unscrew it let me know.

Also I have a questions about the 3 vents i am going to be drilling into the bottom of the barrel. This is what i gathered and you can correct me if i am wrong. I need to drill a 1 inch hole and then i use a 3/4 inch pipe nipple and a 3/4 inch ball valve. Seems funny to me cause a 1 inch hole for something that is 3/4 inch. AGAIN !! i am new to this so please keep the bashing to a minimim.
 
A 3/4 " pipe is that size on the inside. Depending on the schedule (thickness) of pipe, the outside diameter is larger.
 
Novice- look at HeSmellslikesmokes barrel above. That is the current trend in intakes and makes more sense for a bunch of reasons....
 
Novice- look at HeSmellslikesmokes barrel above. That is the current trend in intakes and makes more sense for a bunch of reasons....

Seems like to much cutting of the drum for me. I have limited tools and resources where i am currently living and i have no idea where to get a door like that guy. It just seems like to much work for something that really does not do that much more especially when i want to keep the cost down.
 
I knew i was in for it when i said bung hole...LMAO TP for my bunghole...bevis and butthead..
 
Haha yea its a plastic cap on the metal plug, the larger one had a plastic cap on it as well. I ripped that one off cause i wanted to see what was under the plastic. The smaller one is the same, i just ran outside and ripped it off hahaha. I donnt know how i am going to get the metal cap off. that thing is SO stuck. if anyone knows a good way to unscrew it let me know.

Also I have a questions about the 3 vents i am going to be drilling into the bottom of the barrel. This is what i gathered and you can correct me if i am wrong. I need to drill a 1 inch hole and then i use a 3/4 inch pipe nipple and a 3/4 inch ball valve. Seems funny to me cause a 1 inch hole for something that is 3/4 inch. AGAIN !! i am new to this so please keep the bashing to a minimim.

The small plug should have flat edges, a cresent wrench should do the trick. I went with the patented JD vent tabs. I like em cause you can fine tune then a lot more that the pipe nipples and caps method. With the nipple and cap method you will need to either have the entire cap on or off as I understand it. With the JD tabs, they turn on a single screw and can be opened or closed as much as needed, very much like the vent on a Kettle lid.
 
First, my thanks to all the great contributions of the Brethren and Sistren in the UDS Thread. My goal was to use best ideas I saw to produce a very simple stainless UDS.

This has a Weber Performer Lid with the built-in thermostat and the stainless draft door from Big Green Egg.

SSUDS.jpg


Removable lid seal insert made from old Bar-B-Kettle bottom cut to leave 2" w/ Rutland stove gasket attached to it with high-temp silicon.

RemovableLidSeal.jpg


(Trial run last night was a 14 lb brisket packer, cooked at 300 degrees until probe tender in 5 1/2 hours. Outdoor temperature was low 20's w/ snow showers. Cooked it Lockhart style with outstanding results -- thank you Funk for all the great info you have shared.)

I am going to add handles, but not much more. I like the simplicity.

Get ya a top like this......
th_DSCF5466.jpg


Call and talk to a real person at www.arcticproducts.com and make yours look better!! :biggrin::biggrin:

Just sayin....

Paul B
SS UDS
 
Back
Top