Chill Time Q
Found some matches.
Howdy,
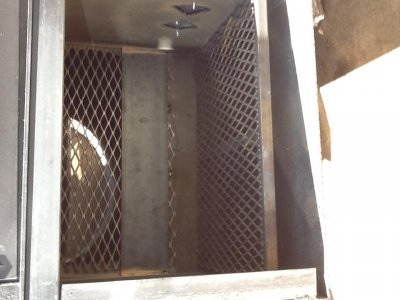
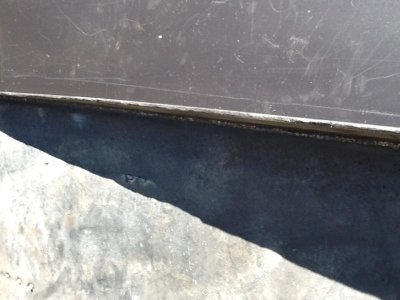
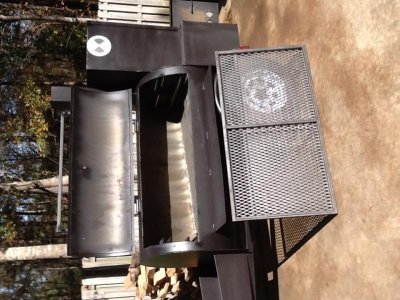
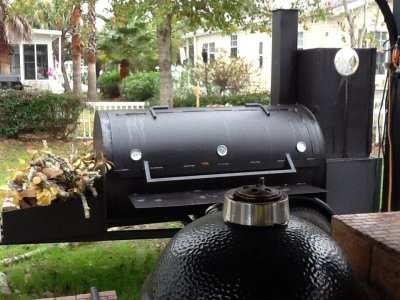
I was looking for a reasonable price pit to move up to and found bang for the buck with a Greasy Hill Customs. They have a decent web page and prices were negotiable. I chose the TOS-01, reverse flow and aded the rib box, basket up front. About mid month in November there was a BBQ brother that posted a great review and improvements on his Greasy Hill. I took those into consideration and contacted John at Greasy Hill. He was pleased to hear of the improvements that were posted on this site. The items he tweaked. Lowered grate in firebox. Added another butterfly vent in firebox. Then my brother in law and I grabbed the grinder and welder and tweaked it some more. Ground all corners and smoothed out any rough spots. Ran a weld along the edges of the reverse flow plate under the bottom grate, this ensured no leak of smoke and heat along the edges. Last, we added a plate in the firebox the divides the fire box from the cooking chamber, this aided in better flow. Now to season it......
Seasoned it with a good fire, no problems running temp up to 350 for initial burn. You could see the fire being drawn into the body of the smoker, so I knew we had good flow. Three cycles of steam clean and then a good slow smoke for about two hours and the interior looked seasoned and ready for the maiden voyage.... So why not a whole hog for the first go....
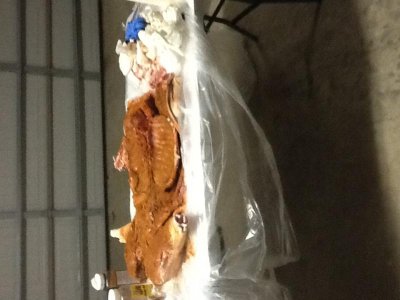
We planned the Saturday after Thanksgiving to have about 30 friends over for a great college football weekend and a whole hog party. A few of my loyal Brethren showed up before first light (with plenty of hydration choices) and helped prep our 65 pounder. Injected hams, shoulders and bit in the loins, not to much though. Rubbed her down with Butt Rub and placed her skin side down. Pit was ready at 225 and we started at 0645. We backed the heat down about 2 pm and let it rest and pulled it apart about 3:30 pm. Wow!!! It was awesome, many gathered at the pit and nibbled on some of the best pork we'd ever eaten. All that remained was skin and bones. All enjoyed and only about two servings were left after all the games were done that evening.
Since then I have done Butts, Ribs and Chicken Thighs all delicious.... The pit holds temp very well and uses about a stick an hour with some charcoal added along the way as well. When choosing this pit I knew what I was buying. Like the previous post was the bones of the smoker are great, with some minor tweaks I now have a great pit and still have a good bit of money in my pocket. John and Felicia were great to work with and I have nothing but good things to say. So if your looking at getting into a bigger pit, bang for your buck, I think you can't go wrong....
Pics of mods and my hog, attached pics, not sure if they will show up, first time doing this... Sorry if this is a long ramble but wanted to share my story..... Regards, Chill
I was looking for a reasonable price pit to move up to and found bang for the buck with a Greasy Hill Customs. They have a decent web page and prices were negotiable. I chose the TOS-01, reverse flow and aded the rib box, basket up front. About mid month in November there was a BBQ brother that posted a great review and improvements on his Greasy Hill. I took those into consideration and contacted John at Greasy Hill. He was pleased to hear of the improvements that were posted on this site. The items he tweaked. Lowered grate in firebox. Added another butterfly vent in firebox. Then my brother in law and I grabbed the grinder and welder and tweaked it some more. Ground all corners and smoothed out any rough spots. Ran a weld along the edges of the reverse flow plate under the bottom grate, this ensured no leak of smoke and heat along the edges. Last, we added a plate in the firebox the divides the fire box from the cooking chamber, this aided in better flow. Now to season it......
Seasoned it with a good fire, no problems running temp up to 350 for initial burn. You could see the fire being drawn into the body of the smoker, so I knew we had good flow. Three cycles of steam clean and then a good slow smoke for about two hours and the interior looked seasoned and ready for the maiden voyage.... So why not a whole hog for the first go....
We planned the Saturday after Thanksgiving to have about 30 friends over for a great college football weekend and a whole hog party. A few of my loyal Brethren showed up before first light (with plenty of hydration choices) and helped prep our 65 pounder. Injected hams, shoulders and bit in the loins, not to much though. Rubbed her down with Butt Rub and placed her skin side down. Pit was ready at 225 and we started at 0645. We backed the heat down about 2 pm and let it rest and pulled it apart about 3:30 pm. Wow!!! It was awesome, many gathered at the pit and nibbled on some of the best pork we'd ever eaten. All that remained was skin and bones. All enjoyed and only about two servings were left after all the games were done that evening.
Since then I have done Butts, Ribs and Chicken Thighs all delicious.... The pit holds temp very well and uses about a stick an hour with some charcoal added along the way as well. When choosing this pit I knew what I was buying. Like the previous post was the bones of the smoker are great, with some minor tweaks I now have a great pit and still have a good bit of money in my pocket. John and Felicia were great to work with and I have nothing but good things to say. So if your looking at getting into a bigger pit, bang for your buck, I think you can't go wrong....
Pics of mods and my hog, attached pics, not sure if they will show up, first time doing this... Sorry if this is a long ramble but wanted to share my story..... Regards, Chill