Been reading and reading and trying to take notes between all the double talk and personal conversations and gets hard when you are supiosed to be working instead. That is why I just need the simple part list and measurements of top rack, lower rack and height of fire basket.

Trust me, I am reading chapter by chapter

The Pickled Pig link I posted has a shopping list and dimensions for all holes on the drum (although I recommend ditching their damper idea and either doing Norco's 8-hole exhaust or do like I did and screw an 8" pipe nipple into the bung hole and cap it off with a pipe cap), and several examples of the fire basket are shown (theirs, mine, Norco's). Unless you want to get fancier with your design, those references are enough to make you a drum that'll work great! :-D

Specifically, on the fire basket, if you don't want to weld, you could do exactly like I did on mine but use stainless wire or stainless zip ties instead of the weld joints, and use the lightweight expanded steel sheet that they sell at Home Depot in 24" squares.

-Rodney
 
Rodney hey man all's cool. Just voicing my thoughts. Hope your smoker works as good as my five do.
 
What is being used (not pvc) at the smoke stacks? I know I know, read the thing. I feel I've paid my dues and read it once but now that I've been building this I forget and really don't want to go back through it all again! Stainliess is cool. If the only option, what kind of shop are you getting it at? And is there a cheaper option besides pvc? (I want a small stack, not just an opening.
 
What is being used (not pvc) at the smoke stacks? I know I know, read the thing. I feel I've paid my dues and read it once but now that I've been building this I forget and really don't want to go back through it all again! Stainliess is cool. If the only option, what kind of shop are you getting it at? And is there a cheaper option besides pvc? (I want a small stack, not just an opening.

I used an 8" long, 2" pipe nipple from Home Depot. Galvanized steel. When you're not using the smoker, you can just spin a cap onto it. Just gotta remember to lube the threads with oil so they don't rust!

EDIT: It also makes a nice handle for the lid!
 
I use 2" stainless for the exhaust.

My basket is made from stainless mesh and attacked with stainless zip ties.
 
I used a 9" long piece of 2" SS pipe for the stack on my SS UDS. Stupid expensive, but it looks cool. I found my UDS ran too hot without a stack, especially on windy days. I think the wind was getting in the big 2+" hole and stirring things up. It's steadier with the stack. Now I need to come up with some kind of weather cap. I nearly had my fire put out during a typical FL frog-strangler. I ran out (in the thunder and lightning) and McGyvered a weather cap of sorts to save the meat, but I need to make something better looking.
 
I purchased a basket on ebay. The gentleman sells complete UDS but I asked if he would sell just the basket. To my surprise he sold me one for $25.00 and I had it within 2 days of completing the auction. You can't buy the parts for the basket cheaper than he will sell it to you. This is the link and once my UDS build is complete I will provice pictures and provide the appropriate kudos
http://cgi.ebay.com/charcoal-smoker-box-/180551197424?pt=LH_DefaultDomain_0&hash=item2a09b0a2f0

My intent is to pass along to my fellow brethern a connection to a quality product at a great price. Hope this isn't considered spam
 
Good score, LS! I built my no weld basket and materials cost at least that.. not including my labor! :clap2:
 
Has anyone ever tried putting 90° elbows on the inside of the intakes?

If you turned them all in the same direction, say all pointing to the right, seems like it would create a swirl effect of the air coming in.

As soon as I can get to the depot, Im going to pick three up and then try the biscuit test, with and without.

Jeff

I've thought about this alot myself. The only thing that has kept me from trying it is wondering if warm air rising in a semi-enclosed column naturally rotates one direction or the other, like water going down a drain...

If it does, then it should be easy to give it an assist with the directional intakes. Question is, which way does it rotate?

That's due to the Coriolis Effect, and it turns in a different direction depending on which side of the equator you're on. In the northern hemisphere, it's clockwise when looking down.

Due to the low density and velocity (and resulting low momentum) of the intake air and the relatively strong influence of thermal updrafts, etc., I think the Coriolis Effect would be swamped out in this case, and is probably not worth considering in the design of your smoker. :-D

Bringing up the Coriolis Effect in the context of UDS design has to mean we've reached a new milestone in the quest to overthink things as much as possible... LOL

-Rodney

Ummmm Yeah, what Rodney said!:nerd::nerd::nerd::nerd::nerd:

If ya need more info, like I always do... here is a link for even more "over engineering" of the subject..
http://en.wikipedia.org/wiki/Coriolis_effect
 
Ummmm Yeah, what Rodney said!:nerd::nerd::nerd::nerd::nerd:

If ya need more info, like I always do... here is a link for even more "over engineering" of the subject..
http://en.wikipedia.org/wiki/Coriolis_effect

I didn't even know there was a nerd smiley! LOL

For what it's worth, I was wrong about the direction that a vortex in the northern hemisphere would spin, according to the Wikipedia article. ;-)

http://en.wikipedia.org/wiki/Coriolis_effect#Draining_in_bathtubs_and_toilets

-r
 
Last week I lifted the lid of My UDS too quick, the swirling vortex escaped, spawned a dirt devil which escalated into a mini tornado, took out a few clothes lines, and my neighbor's crab apple tree. The upside is that I now have more smoking wood and a few new t shirts.
 
I used a 9" long piece of 2" SS pipe for the stack on my SS UDS. Stupid expensive, but it looks cool. I found my UDS ran too hot without a stack, especially on windy days. I think the wind was getting in the big 2+" hole and stirring things up. It's steadier with the stack. Now I need to come up with some kind of weather cap. I nearly had my fire put out during a typical FL frog-strangler. I ran out (in the thunder and lightning) and McGyvered a weather cap of sorts to save the meat, but I need to make something better looking.


Curious how much did the stainless set you back?

I also use about the same length stainless pipe when the winds are calm but for the rain/snow I have a stainless elbow.
 
I bought an 18" Schedule 40 nipple, threaded on both ends (McMaster-Carr). I cut it in half to make one stack for my rig, and one for a buddy I built a SS UDS for. It was $55 for the 18" piece! I've spent a few bucks making my all-stainless UDS, but it should last me a long time! I just hate when I build something that works perfect, only to have it rust/rot/wear out.
 
Ouch!! I'll go take a picture of my stack if you want.
 
First time UDS build

Thanks to all on the thread for pointing me in the right direction. I finished the build (less painting and adding a few toys) last night and this thing is Awesome!

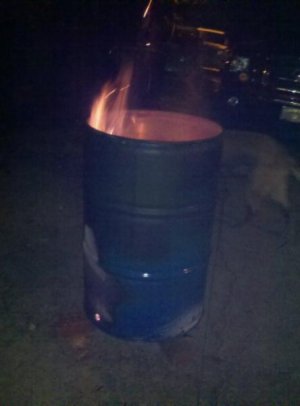
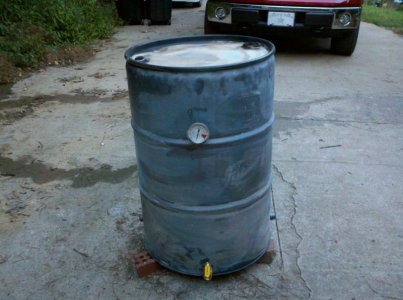
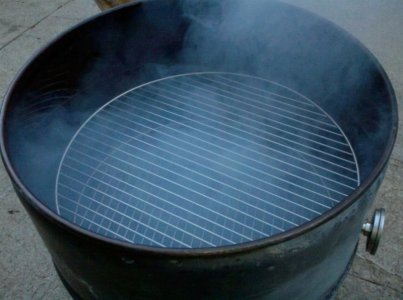
I scored my open top barrel for $10 from a place that sells wholesale car wash and detail supplies. Mine had car wax inside. Took a trip to the car wash and rinsed out most of the residue, wiped down the rest and then did a mega burn by lighting up some firewood with my new best friend, my harbor freight weed burner, they had the deluxe model with the igniter on sale for $29, I toyed with getting the cheaper one for $19 but glad I got the red button to push..

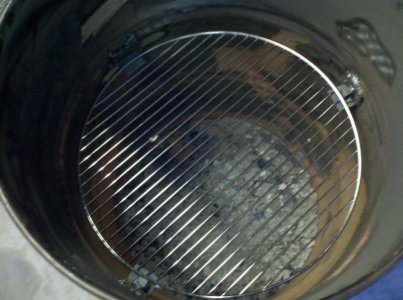
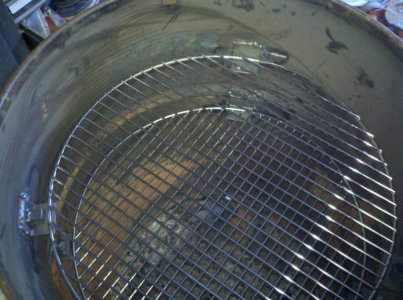
I scored my grill grates at Academy Sports, they had them on clearance for $3.99 and the smaller charcoal grate for $2.99. (I did not realize at the time that these were a bit smaller than the more expensive weber grates, I saved $30 but had to modify my 1.5" Angle grate supports by adding a 1/2" square tube spacer on 2 of the 3 supports to keep the smaller cooking grate from slipping off of the supports.

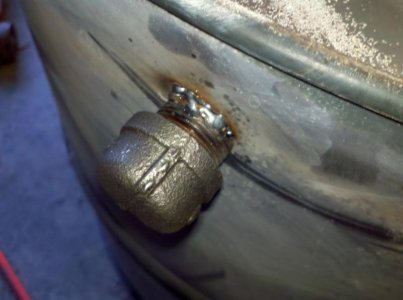
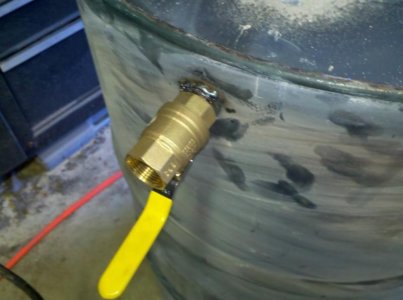
I decided to go with 3 - 3/4" X 1" nipples for my air intakes and added caps to 2 of them and a ball valve (Ball Valve from Harbor Freight, saved 2 bucks) to the 3rd nipple ( that is funny, did I just say 3rd Nipple :becky:).

I used the 2" Bung on the stock lid for the exhaust but I am looking for a 2" long pipe for an exhaust stack, could not find a 2" nipple or pipe at HD or Lowes, where do you find these things?

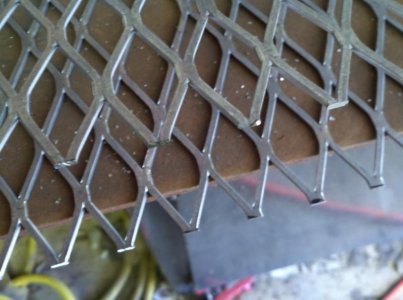
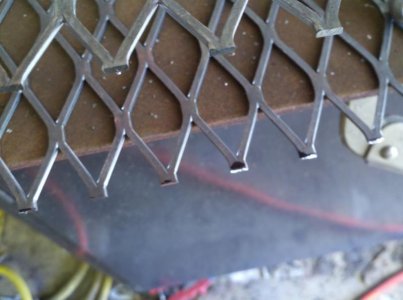
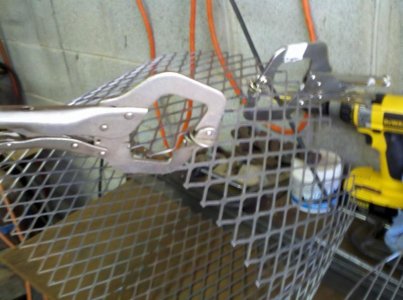
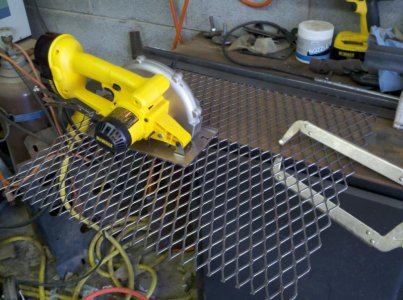
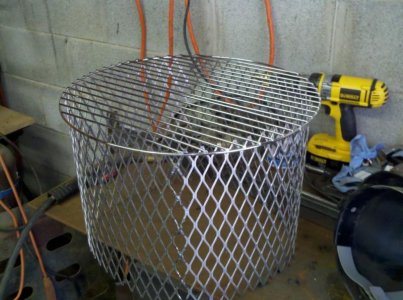
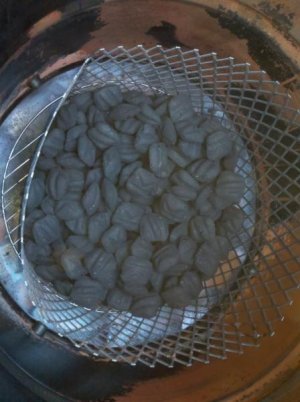
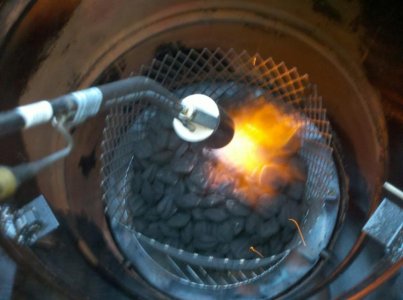
For the charcoal basket I used 3/4" expanded metal 24"X24" from HD for $18. I cut the piece in half with my cordless circular metal saw. I have had this saw for 3 years (came in a large kit of DeWalt cordless tools I bought) but never used it before. Wow, these circular metal saws are the ticket, it cut smooth as butter, fast as lightning and not sparks. The edges were very smooth. I welded the two pieces into one long 12"X48" piece and then bent that in a circle and welded the ends together.

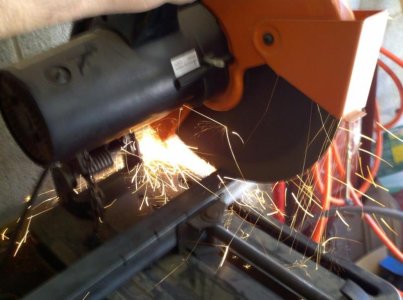
At this point I realized that my Argon gas line was not hooked up to my welder from a recent move, no wonder my welds were so bad.. Still not great but working much better with the gas!

I added 2.5" 1/2" square tube legs on my basket to get it off of the bottom and will add an 18" pizza pan if I can ever find one??

I cut the 1.5" angle into 2" strips for the 6 L bracket Cooking grate supports and welded the bottom set first and the top set last. I tried to use a magnetic holdermajiggy to hold the brackets in place while welding but after having it fall into the bottom of the barrel a few times I resorted to the Orange County Choppers method of hold with one hand tack with the other and look the other way when you pull the trigger!

I was still fiddling with the settings on my welder and getting back in the groove and burned a few holes in the barrel when welding the L supports on. I puddled up some welding wire and filled the holes but it still pissed me off!

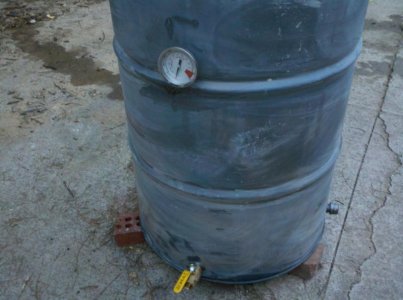
I used a step drill bit from HF to drill all the holes and added a single thermometer ($9.99 from Academy Sports) between the upper and lower cooking grates.

I did not add a handle as I think the 2" pipe might work for this when I find one.

Trying to decide on the paint scheme, flat black is cool and rat rod looking but also thinking that a glossy color might be cool...

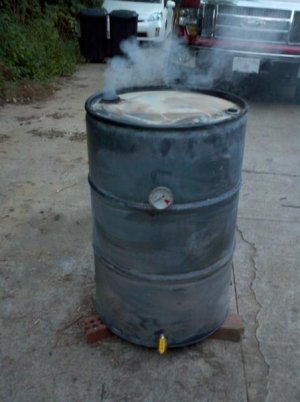
I sprayed the inside with Pam and added about 10# of Kingsford to the basket. After lighting this with the flame thrower, I added several chunks of hickory. All intakes wide open and the top off to get it breathing, then added the top and watched the temp very slowly creep from 150º to 200º. I capped the 2 side intakes and she rocked steady at 200º. I opened the intakes again and watched it climb to 300º then throttled it back to 250º.

I threw a test run of 1 slab of spare ribs on and tried to maintain 275º. I read that was right but it seems to hot and the ribs were done in 2.5 hours.

Maintaining the 275º temp was not too bad but it would ramp up to 300º at times and drop as low as 250º. I did find myself taking off the nipple caps and putting them back on a bit but it was not a big deal.

After finishing with the ribs I opened up all of the intakes and shook the barrel a bit to get it up to max temp. It climbed to 425º and stayed there steady as a rock for over 2 hours. Not sure how long it actually stayed at 425º because I went to bed.

All in all on of the best projects ever, I already have friends asking questions so more builds to come!
 

Attachments

  • burn.jpg
    burn.jpg
    18.2 KB · Views: 678
  • cutgrate.jpg
    cutgrate.jpg
    52.5 KB · Views: 680
  • cleancut.jpg
    cleancut.jpg
    44.5 KB · Views: 679
  • clampbasket.jpg
    clampbasket.jpg
    59.2 KB · Views: 680
  • metalsaw.jpg
    metalsaw.jpg
    84.4 KB · Views: 679
  • sparks.jpg
    sparks.jpg
    56.1 KB · Views: 679
  • basket.jpg
    basket.jpg
    79 KB · Views: 675
  • grateloswersupports.jpg
    grateloswersupports.jpg
    62.2 KB · Views: 677
  • uppergratesupports.jpg
    uppergratesupports.jpg
    75.3 KB · Views: 700
  • loadedbasket.jpg
    loadedbasket.jpg
    38.6 KB · Views: 679
  • nipplecap2.jpg
    nipplecap2.jpg
    42.7 KB · Views: 677
  • ballvalve.jpg
    ballvalve.jpg
    43.6 KB · Views: 677
  • flamethrower.jpg
    flamethrower.jpg
    47.6 KB · Views: 675
  • uglydrum.jpg
    uglydrum.jpg
    64.8 KB · Views: 692
  • uglydrum2.jpg
    uglydrum2.jpg
    56.4 KB · Views: 692
  • wehaveliftoff.jpg
    wehaveliftoff.jpg
    32.1 KB · Views: 697
  • smokin2.jpg
    smokin2.jpg
    55.8 KB · Views: 676
Back
Top