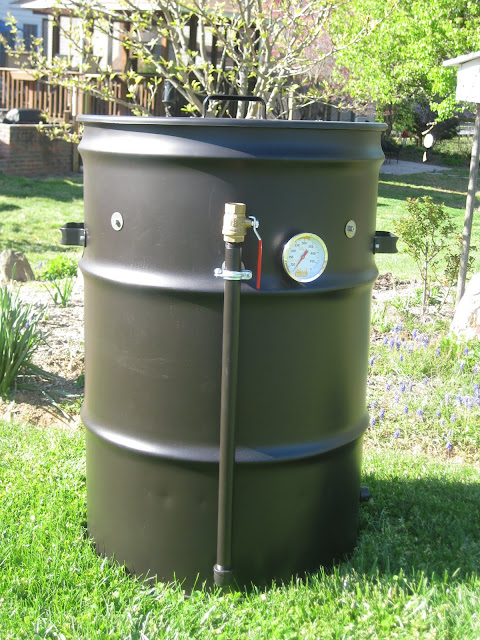
UDS # 2 - The KISS Version

No it's not the Gene Simmons Kiss!

It's the "Keep It Simple Stupid!" Drum Smoker

A simple sturdy build to make it last under heavy use

Heavy Duty, thick wall drum
Two coats Rust -Oleum High heat shot with an automotive HVLP gun
Powdercoat gate handles from HD
All fasteners are socket head stainless steel, with fender washers and nylock nuts, yes they can stand the heat.
Pipe fittings are tack welded on the inside
Standard charcoal basket

A cooking machine for the BBQ Comp's.


IMG_2186.JPG
 
Hello guys. I have acquired a food grade drum, and I'm going to start my UDS build. I want to get everything planned out before I get it sandblasted. I'm about 100 something rather pages into this thread and my eyes are crossed, so I'm sorry if this was covered.

My drum has a 2" bung in the bottom that fits 2" threaded pipe perfectly. Is it okay to use one 2" intake and one 2" exhaust for these? That would save me a ton of fabrication, cost and time if it does.

Thank you, and I have enjoyed the 1/6th of the thread I have read so far. Good stuff guys!

In My experience and my opinion, yes just one 2" vent/exhaust should work fine as long as you can control the intake with a valve of some kind.

G

 
Why cut holes and add nipples?

I understand the ball valve but why cut holes and then cap them with nipples and a cap?
 
I understand the ball valve but why cut holes and then cap them with nipples and a cap?
To keep the weather out when not in use plus it helps shut down the drum at the end of the cook. Some find that if temps get away or don't come up as well adding or removing caps solves the issue.
 
Dr KY hit it right on the head, if the ball valve wide open doesn't give you enough heat then take a cap off and adjust the ball valve if you still need more air take the last cap off. When your done cap every thing off and close the ball valve to kill the fire.

pwa
 
plugs and caps are used for 2 reasons. 1) they are cheaper than ball valves. 2) by removing caps, you get pretty much complete control of air from 0-3 open.

There is no real reason for the added cost of 3 ball valves when 1 ball valve and 2 caps can do the same thing. Depending on your desired temp, you will often start all open, then usually cook with just the valve (both caps closed). If you have damp charcoal or want more heat, you can always remove a cap and get 1+ the valve open.

While I never had a huge problem with an uneven burn using 2 caps and a valve - if you want to go with one huge intake, you might want a deflector. w/o a deflector my guru did have an uneven burn.
 
Guru/Stoker & Temp probe eyelet inquiry

Hi guys, looked through this thread since we built our 2 drums for Competitons.

But....I can't seem to find specific info. on how folks using their drum with a Guru. I'm an egghead, and understand how the guru works, but wasn't sure of the recommendations for using one with a drum. As we're using these for Competiton, we'd like to use a guru to help with peace of mind through the night (while also getting some sleep!). I also don't see anything specific on Guru's site, regarding a recommendation/adapter plate for use with a drum.

Lastly....any updated products that work well as 'eyelets' for inserting temp probes into the side of the drum? We're currently using the 12" turkey fryer temp probe...but would like to make things nicer for adding temp/food probes.

Thanks for any and all input!
 
Lastly....any updated products that work well as 'eyelets' for inserting temp probes into the side of the drum? We're currently using the 12" turkey fryer temp probe...but would like to make things nicer for adding temp/food probes.

Thanks for any and all input!

I use a metal valve stem for the 12" turkey fryer thermometer and a Halex 1/2" watertight conduit connector for the digital thermometer probes.

http://images.oreillyauto.com/parts/img/large/xts/15-416.jpg

http://www.homedepot.com/h_d1/N-5yc1v/R-100170032/h_d2/ProductDisplay?catalogId=10053

I'm working on UDS #5 now and have not found anything better.
 
Hi guys, looked through this thread since we built our 2 drums for Competitons.

But....I can't seem to find specific info. on how folks using their drum with a Guru. I'm an egghead, and understand how the guru works, but wasn't sure of the recommendations for using one with a drum. As we're using these for Competiton, we'd like to use a guru to help with peace of mind through the night (while also getting some sleep!). I also don't see anything specific on Guru's site, regarding a recommendation/adapter plate for use with a drum.

Lastly....any updated products that work well as 'eyelets' for inserting temp probes into the side of the drum? We're currently using the 12" turkey fryer temp probe...but would like to make things nicer for adding temp/food probes.

Thanks for any and all input!

Here is my drum running on the guru

3/4' adapter and eyelets for the probe wires, works like a charm.

IMG_1649.JPG
 
Back
Top