Need details on the blower setup! Definitely a neat looking setup! :thumb:

That is a "Stoker" by brand, 10CFM blower. Has a 12VDC motor (I removed the Stoker electronics) and wired in a 12DC razer charger cord.

The Pid controller is an AUBER Ins. device. 6 programable steps based on time. (60MIN at 100F, 240MON at 225F)

Their link is on my Blog (see Signature)
 
Well guys, I have read most of this thread and I am ready to build my own UDS. I obtained a drum today (hard to beat the price since it was free). I still have to come up with all the other parts and pieces but I have a lot of great ideas thanks to this thread and none of the other parts seem to be too hard to come by.
It will likely be a few weeks before I start construction, but, I do want to say thanks to each of you that have contributed ideas and pictures to this thread. I am sure that they will guide me safely to my quest for good food from my own UDS.

Thanks again,

Stan
 
Stan, it's an easy build bro. My best advise is to keep it as simple as possible. That is what will work the best. Keep us posted on what you decide on.
 
Just finished up a valve mod over the weekend. I was getting tired of guessing and checking the valve ball locations during a cook. So I decided to make the adjustment easier to get to and easier to know the valve status.

standoff.jpg


valvebracket.jpg


assembly.jpg
 
You know the drill, no pictures then it did not happen --pictures please

Just finished up a valve mod over the weekend. I was getting tired of guessing and checking the valve ball locations during a cook. So I decided to make the adjustment easier to get to and easier to know the valve status.
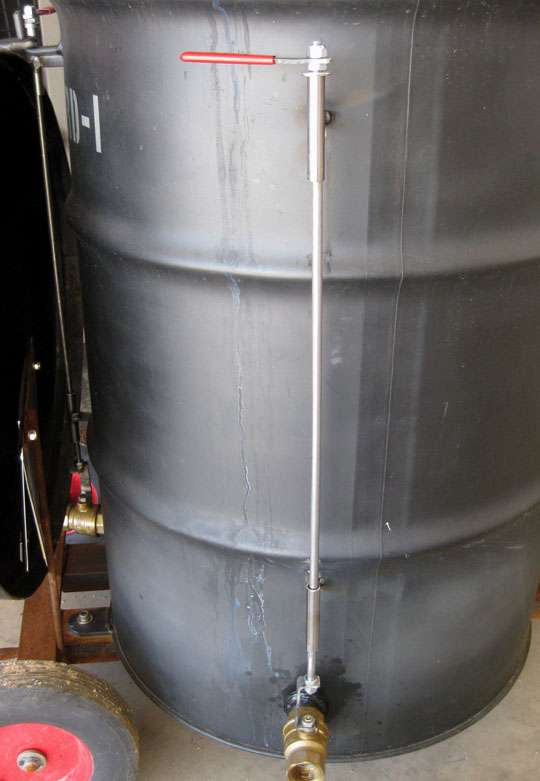
standoff.jpg


valvebracket.jpg


assembly.jpg
 
Why didn't you just put an elbow on the nipple, a length of pipe and mount the ball valve near the top of the drum so you could see it?
 
Last edited:
Why didn't you just put an elbow on the nipple, a length of pipe and mount the ball valve near the top of the drum so you could see it?

I have 3 valves and doing all 3 in pipe is just too bulky IMO. Plus, I've read some things about air flow issues with the extended pipe and valve remoted like your pictures.

I know the valve location based upon the handle location, much like the original handle location on the valve. Jsut got tired of bending over and adjusting and checking.

Besides, I have a welder, chop saws, tap & die kits, time, and I like to fabricate.

Just another way to "skin a cat". :clap2:
 
I have 3 valves and doing all 3 in pipe is just too bulky IMO. Plus, I've read some things about air flow issues with the extended pipe and valve remoted like your pictures.

I know the valve location based upon the handle location, much like the oriignal on the valve. Jsut got tired of bending over and adjusting and checking.

Besides, I have a welder, chop saws, tap & die kits, time, and I like to fabricate.

Just another way to "skin a cat". :clap2:


I just use my foot to adjust mine :laugh:
 
airflow issues? theres really no air pressure involved. The slight vacuum created by the heated air escaping through the exhaust would not be affected by elbows or length of pipe.
 
air flow issues with the extended pipe

oddly i had the same thing with my original setup and ended up changing it with far better results.

it does seem to work for some people tho.

maybe it just has to do with me being at lake level :confused:

would not be affected by elbows or length of pipe

FWIW pressure and flow are always affected by elbows and lengths (restrictions and orifices). whether it's significant enough to cause a problem with this application i don't have the equipment or desire to find out.
 
I have 3 valves and doing all 3 in pipe is just too bulky IMO. Plus, I've read some things about air flow issues with the extended pipe and valve remoted like your pictures.

SK... so if yo have three valves, during your cook, after you've got the heat up, etc, are you opening all three slightly, or some variation thereof? Just curious, as I was thinking of doing the same to mine, and playing with air from three sides, rather than just one. Didn't know if that was the thought, or would it make a difference... :confused:
 
SK... so if yo have three valves, during your cook, after you've got the heat up, etc, are you opening all three slightly, or some variation thereof? Just curious, as I was thinking of doing the same to mine, and playing with air from three sides, rather than just one. Didn't know if that was the thought, or would it make a difference... :confused:

I like the idea of 3 valves equally spaced around the base of the drum. Better to have more air and be able to turn it down then not getting enough air.

I'm thinking that with three valves, equally spaced, the charcoal basket will burn evenly and better as opposed to one or two intakes, just a theory. But, this design works for me, and I have no problem getting the drum up to temp or dropping it and holding it to below 200.

I try to keep all valves open or partially closed the same amount to allow an even amount of air to the basket. Of course, there have been times I had to close one or two when trying to reduce the temps for low heat smoking.
 
I'm thinking that with three valves, equally spaced, the charcoal basket will burn evenly and better as opposed to one or two intakes, just a theory. But, this design works for me, and I have no problem getting the drum up to temp or dropping it and holding it to below 200.

My thoughts exactly. Already have the three and pipe in place. Replace caps w/ the ball valves and give it a whirl!! In my head anyway, air from the three creates a more even heat distribution possibly... Either way, glad to hear I'm not the only one thinking this way.... :crazy: :becky:
 
I want to eliminate the variables in my BUFORD/UDS. At all times, I want full control over the air intake, exhaust, charcoal basket, grate heights, smoke volume and duration, etc.

That way it boils down to just the consistency of the meat, my rubs, injections, glazes, etc. Which are still a alot of variables, but at the end of the day, I can't blame anything on the smoker.
 
My first of 4 UDS's

I found this forum thru another forum and got hooked immediately..

Found 4 barrels and going to make 4. The first one is finished .. did a test burn and now doing a test cook. Only need one... lol

Nothing special except for the one I am keeping I used a 18 in plow disk for the ash tray. Not sure if you can see the disk of not. It is not finished on the picture but almost. I am also going to make a lighter charcoal basket to have closed to the top so I can use as a grill. All have a dome lid and flast lid. I got a great deal on some 22.5 grills from Academy they we $25 and I used a lot of the hardware..

005-3.jpg


006-3.jpg


002-5.jpg


001-1.jpg


006-4.jpg


008-5.jpg
 
Last edited:
Joined here a few months back, read a good majority of this thread, and with a big push from a guy named Bacchus in ATL, I've started building my first UDS. Thank you to all who have posted their advice, trials, and expertise.

So far, I've drilled four 1" intake holes, then did the burn-out on the food grade drum, then used a Norton 4" stripping wheel to bring the inside and outside down to bare metal. Waiting for my welder to finish the coal basket, then install the cooking grate and thermo.

Cannot wait to do the seasoning to see how this thing handles. Hopefully this joker will finish the basket this week. Hoping...don't think I'm exactly his priority customer. lol
 
My first UDS. I completed this past weekend. Thanks to everyone who has posted on this forum, it helped me along tremendously. The only problem I have is my cooking distance. I can't get it much more than 20 inches from my fire. right now it's sitting at 18in. Any suggestions? help?
 

Attachments

  • IMG_0007 (600x800).jpg
    IMG_0007 (600x800).jpg
    44.9 KB · Views: 1,151
Back
Top