• working on DNS.. links may break temporarily.

Project "HUMPTY" — Kamado/BGE Restoration, Vancouver, Canada

Condensation on Mortar Inside

I also took my time to air dry the mortar before doing the bakeout (1 whole week). Even then, I kept things around 250-300F for a few hours before going up higher, but nothing more than 400F for the first few firings since mortaring. But I got little bubbles the first time, then more and bigger ones with each additional firing. Some of the mortar bubbles are as large as my palm.

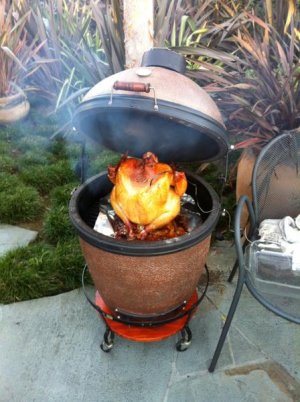
Now that Humpty's insides have been mortared, I've noticed condensation on the mortar almost every time I lift the lid after he's cooled down (say overnight or longer). At first I thought it was due to our West Coast humidity - it rains a lot here. After all, Humpty is kept outside under cover but doesn't get rained on.

:confused: However, now I'm wondering if the condensation is due to the trapped moisture that collects on the mortared walls when I snuff out the coals by closing the bottom damper and use the ceramic top. After all, water is a by-product of combustion.

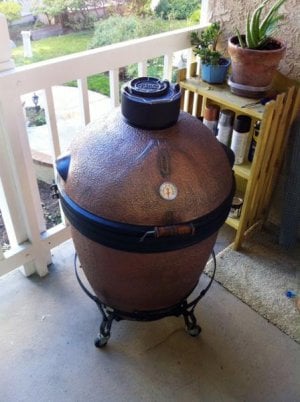
This picture of the dome was taken after Humpty had cooled down overnight after a cook. The shiny sheen is condensation. It's usually wetter near the neck opening but the condensation also extends down into the bottom walls too.
iE1CAEB88-D773-4D69-B16E-CA4A703C1E58.jpg


For what it's worth, I never noticed condensation on the bare claypot walls before mortaring the entire inside.

So, I'm thinking that the trapped condensation diffuses back into the "cured" mortar. Then when I fire up again, the water makes steam, which gets trapped in the mortar causing it to puff up and make more bubbles.

One thing about curing the mortar in an electric oven is that it is a DRY environment as there is no combustion happening to produce water (can't say the same for a gas oven).

Because the mortar continues to bubble after each firing and cookout, this tells me it has not fully cured.
  • Maybe I have to get the temperatures up even higher? But I did get to about 550F during my last cook. And I've been warned not to take it much higher so as not to crack the claypot further....
  • Perhaps the Imperial furnace cement I'm using has different properties than the Rutland brand you're using?
  • Maybe I got a bad or expired batch? But I bought 3 different tubs on 3 different occasions... and the mortar's behaving the same wherever it's been applied....
:confused: All this might explain why other people's mortar repars are NOT bubbling and why mine IS continuing to bubble... but then maybe not.:?: :?: :?:
__________________
MayDay
Project Humpty: SLIDESHOW, PHOTO ALBUM
Kamado Claypot, Cobb
 
I am late to the party, but I thought I should reply in case my 2 cents are useful (probably not).

it looks exactly like the clay hibachi cooker I bought years ago from an importer of pachinko machines (markings, color, clay feet, cradle, hinges, clay top, metal top etc.). I believe they were intended to be kamado knockoffs.

It worked well for low heat applications but cracked very easily once the heat got to 400. I would nt grill on it if I were you, but any kind of bird will come out better that you can achieve on a grill, offset, pellet, drum etc.

I ultimately got rid of mine because it cracked more than once and I learned about the ceramic units.

It looks like you did a great restoration job.

Hmmm... I never thought of that. Looks like I DO have a knockoff, as it sure doesn't have the Japanes characters on it. I guess they don't perform as well as the original old Kamados. Well, I'm sure getting to know my knockoff cooker with every cook.

After all's been said and done, I'll probably bite the bullet and eventually get myself a CERAMIC cooker. I'm learning via this forum that the ceramics can do a whole lot MORE than what the claypots can. Perhaps a BGE or Primo... but that's for later. After I get my cooking's worth out of this one. :evil:
 
Thanks OrangeBlood! Not sure I would put so much effort in next time.... :icon_smil
 
After all's been said and done, I'll probably bite the bullet and eventually get myself a CERAMIC cooker. I'm learning via this forum that the ceramics can do a whole lot MORE than what the claypots can. Perhaps a BGE or Primo... but that's for later. After I get my cooking's worth out of this one. :evil:

Hey, use it 'til it crumbles. I was planning on buying a LBGE at my upcoming eggfest, but I'm not so sure now. I used an accurate thermometer last night on my oldie, and realized that my high-temp grilling was in excess of 650*. I'd like more space, but I don't know if that is worth the cost, even with 20% off. What else will I be gaining?
 
MayDay - Jim Beam is right "use it till it crumbles."

My was great for low temp cooking (isnt that what our forum is supposed to be about?). had i known it couldnt take the high heat before I tried high heat cooking it still might be in service now. Not a bad cooker - its just one that has to be used right.
 
Thanks Jim Beam, OrangeBlood. That's what I intend to do — USE IT TILL IT CRUMBLES!!!

Ahh, the freedom... now that I'm out of repair mode and into "user" mode. It doesn't matter anymore.... :mad:
 
May - You were my inspiration. I was fortunate enough to be the recipient of a Kamado Pot in distress. The fire box required repair, as did the ring above it. Lots of grime and rust to clean up, new gasket, replaced a couple of casters, and paint..... but the results were worth the effort. I've always used Weber kettles (I have four!) Now I just need to learn how to use the Pot for slow cooking and smoking!

A before and after.......

Thanks again - Phil
 

Attachments

  • PC090025.jpg
    PC090025.jpg
    48.3 KB · Views: 222
  • P1200050.jpg
    P1200050.jpg
    72 KB · Views: 222
May - You were my inspiration. I was fortunate enough to be the recipient of a Kamado Pot in distress. The fire box required repair, as did the ring above it. Lots of grime and rust to clean up, new gasket, replaced a couple of casters, and paint..... but the results were worth the effort. I've always used Weber kettles (I have four!) Now I just need to learn how to use the Pot for slow cooking and smoking!

A before and after.......

Thanks again - Phil

Nice job! Are you going to keep it black?

I left my Hibachi Pot refurb covered outdoors and the furnace cement repairs leached through the black BBQ paint. When the weather warms up I'll have to sand it down and use some Zinsser primer over the patch job, then repaint it.

Check out the Naked Whiz site and run a copy of the Pachinko Palace Kamado Manual, it'll get you going on the right track.

100_2812.jpg


100_2571.jpg
 
Wow! Nice. Great idea. Wondering what happened with May Days cooker, was it ever working like he wanted it to?
 
Check out the Naked Whiz site and run a copy of the Pachinko Palace Kamado Manual, it'll get you going on the right track.

I was fortunate to get an original of the Kamado Smoker BBQ Cookbook, from Pachinko Palace Inc. with the Pot (The same one you have pictured).

I plan on leaving it black for the time being - I need to learn how to use it before I go any further. I've had Weber kettles forever..... this is something new. Recipes and tips for ribs would be appreciated.

Phil
 
Great Rescue Hondo!

May - You were my inspiration. I was fortunate enough to be the recipient of a Kamado Pot in distress. The fire box required repair, as did the ring above it. Lots of grime and rust to clean up, new gasket, replaced a couple of casters, and paint..... but the results were worth the effort. I've always used Weber kettles (I have four!) Now I just need to learn how to use the Pot for slow cooking and smoking!

A before and after.......

Thanks again - Phil

Phil,

Lovely, lovely.... Beautiful job. I'm glad this thread helped your Resto'. Looking at your "before & aft" photos brings back fond memories when Humpty and I really bonded :rolleyes: :lol: .... Well, me and the Copper Cooker spent a lot of time together. Have you played and cooked with yours yet?

As others have cautioned, don't let the temperatures go too high (400F max?) as that can crack the old claypots that we have. In hindsight, I think I may have done that inadvertently (>550F temp spike Firings #3&4 :icon_blush:), which probably caused hairline cracks to grow AFTER my phase 1 repairs and killed the JB welds in the firebox, therefore prompting Phase 2 repairs (initial pics below). Your pot may be a bit more robust if there were no cracks to begin with, but WATCH THE HEAT!!!
i10C2D818-F525-4241-B349-BC41764F66AE.jpg

iA17C4DCB-4633-42B3-8BF7-62950BF3D812.jpg


All the best.
__________________
MayDay
Project Humpty: SLIDESHOW, PHOTO ALBUM
Kamado Claypot, Cobb
 
Took a break...

Wow! Nice. Great idea. Wondering what happened with May Days cooker, was it ever working like he wanted it to?

Hello Chris, Brethren and all,

Thanks for the kind thoughts. I took a break from the BBQ'ing and the site as I was spending WAY too much time on the forum and not attending to priorities like finding a job. :cry: Plus, I found my waistline expanding. :eek: :icon_blush: So what's a girl to do? Abstain, of course! :biggrin:

I did do a winter BBQ with the Cobb when we had 2 feet of snow in December but I'll probably get back into Q'ing when things settle down a bit more. Still have yet to replace the fiberglass gasket on Humpty before firing him up again.

Hope every one of you are well. I've forgotten what a great community this site is and what looking at pron can do to me..... Drool! Wishing you all a great 2009 and lots of Happy Q'ing.
__________________
MayDay
Project Humpty: SLIDESHOW, PHOTO ALBUM
Kamado Claypot, Cobb
 
Last edited by a moderator:
Good to hear from you MayDay! I've had piss poor luck with the Rutland and Hercules on my ceramic Big Green Egg, and I just said the hell with it and chipped it all off and went with more JB Weld, its the only stuff that adheres to the ceramic.

My Kamado projects are on hold until it warms up. I sold the Fuji Kamado and the Hibachi Pot will have had at least 6 months to cure. The fire boxes haves been baked in the oven off and on at 500*+ with no cracking or bubbling like yours or my BGE, I'm feeling good about that.

Keep in August 1-2 for the Canadian BBQ Championship at Whistler BC, I hope to cook there if my passport ever arrives!
 
Have you played and cooked with yours yet?

Not yet, but I'm going to give it a try in a day or two. I've been out of town (B.C.S., Mexico) where I spent a week with some of your countrymen in the 80+ deg weather :icon_cool
 
This is a great thread, very informative. I know it has been dormant for a while (over a year), but hopefully it's not too late for a follow up...

MayDay, just wondering how Humpty has held up after all this... still going strong and cooking well after 1+ years? I recently acquired an old Chinese claypot kamado that is in need of some work and am just curious what to expect out of a repaired claypot...

Planning to start a new thread to document the repair process soon once I find time to start tackling it.

Thanks!
 
i feel that I'm a few years late here but I also have been restoring a clay Kamado, I'm having trouble figuring out what to use as the fire pit door at the bottom of the clay pot. I'll show yall some pics of my work so far and see if yall have any concerns and suggestions. I'm on a low cut college budget.

This is the paint job after JB welding together the top. The circle is what the original color was.

I used the plasma cutter to make a new fire grate. About 1/3 inch thick steel from a tractor part.

Then I proceeded to cut out a cap with thinner steel and it actually lays pretty flush with the top... but this is experimental to say the least.
So if any one has any suggestions on the fire door air vent that would be awesome. Sweet thread btw.
Here are pics:http://dl.dropbox.com/u/22570705/IMG_0604.jpg
http://dl.dropbox.com/u/22570705/IMG_0611.jpg
http://dl.dropbox.com/u/22570705/IMG_0612.jpg
http://dl.dropbox.com/u/22570705/IMG_0613.jpg
http://dl.dropbox.com/u/22570705/IMG_0614.jpg
http://dl.dropbox.com/u/22570705/IMG_0615.jpg
 
Wanted to say thanks for all the great info.

I found this old Kamado on Craislist, the first pic is what it looked like when I purchased it. I took a lot of what I found from this great site and fixed it up and now it's my pride and joy. Thank you everyone for the great advice and resource I've found on here.
 

Attachments

  • IMG_0029.jpg
    IMG_0029.jpg
    29.7 KB · Views: 202
  • IMG_0041.jpg
    IMG_0041.jpg
    45.3 KB · Views: 196
  • IMG_0050.jpg
    IMG_0050.jpg
    453.9 KB · Views: 200
  • IMG_0123.jpg
    IMG_0123.jpg
    53.9 KB · Views: 201
  • IMG_0782.jpg
    IMG_0782.jpg
    59.5 KB · Views: 202
Keep up the good work!

I'm in the middle of a restoration on the Sakura Kamado I picked up a couple years ago.

100_2276.jpg


The firebox has hairline cracks and the base is just kind of disintegrating, so I'm building it back up with furnace cement. Very easy but time consuming fix!
 
Help identifying my Kamado

Hey Swamprb, would you or anyone else be able to help identify what type of kamado I have? I've done quite a bit of searching online and think it might be a Hibatchi pot?
 

Attachments

  • IMG_0041.jpg
    IMG_0041.jpg
    45.3 KB · Views: 172
Back
Top