B
Billie
Guest
Hi everybody,
Smoke in NJ asked me how i built my PID controller and instead of replying in PM i thought I'd share it with all you guys")
It all started when i made my third PP...I got tired with staying all night long by my Q, just to keep sure it stayed at a stable temperature...
I looked everywhere for a system, but all of them were more expensive than i could afford...
So i started with a budget of 50€ (about 66$) and went out on the Internet and found the most expensive parts i needed...
I bought two fans which cost about 5$ for the two of them...

The PID controller was about 10$...you can find them cheaper if you shop around. I bought the 12/24V one --> D1S-2R-24, but a better choice would have been the D1S-VR-24 because of the SSR relay.

The other small parts (switches, connectors, jacks, box, ...) i bought in a local electronics store...
All together i went 6$ above my initial budget...
Here is the schematic for connecting all the parts...

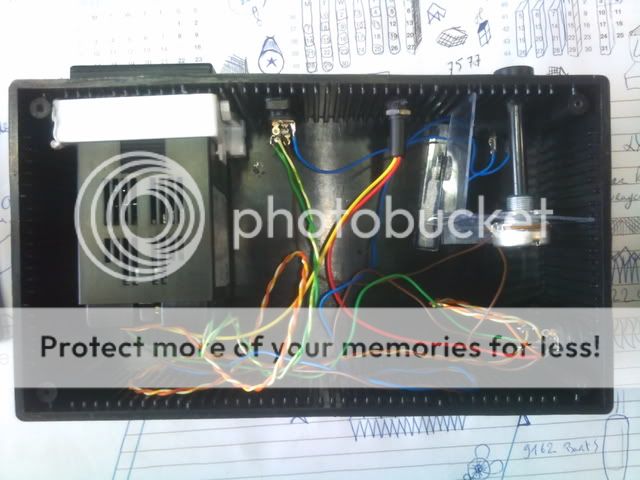
And for those of you that like Pr0n...
The internal parts...
The outside of the box...

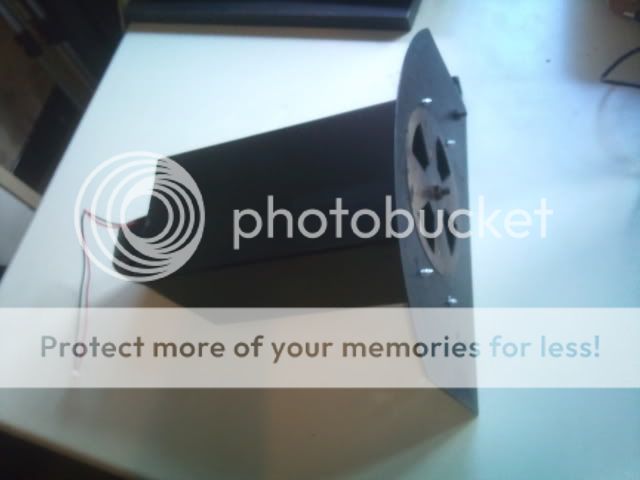
Here i mounted the fan to the door of the Q...

For those of you that would like to see the PID in action...
MOV_0143.mp4 video by BillieChillie - Photobucket@@AMEPARAM@@http://vid893.photobucket.com/player.swf?file=http://vid893.photobucket.com/albums/ac134/BillieChillie/MOV_0143.mp4@@AMEPARAM@@vid893@@AMEPARAM@@893@@AMEPARAM@@ac134/BillieChillie/MOV_0143@@AMEPARAM@@mp4 and MOV_0144.mp4 video by BillieChillie - Photobucket@@AMEPARAM@@http://vid893.photobucket.com/player.swf?file=http://vid893.photobucket.com/albums/ac134/BillieChillie/MOV_0144.mp4@@AMEPARAM@@vid893@@AMEPARAM@@893@@AMEPARAM@@ac134/BillieChillie/MOV_0144@@AMEPARAM@@mp4 the PID is in Autolearn mode.
Hope you enjoyed this read
Greetings Tom
Smoke in NJ asked me how i built my PID controller and instead of replying in PM i thought I'd share it with all you guys
It all started when i made my third PP...I got tired with staying all night long by my Q, just to keep sure it stayed at a stable temperature...
I looked everywhere for a system, but all of them were more expensive than i could afford...
So i started with a budget of 50€ (about 66$) and went out on the Internet and found the most expensive parts i needed...
I bought two fans which cost about 5$ for the two of them...
The PID controller was about 10$...you can find them cheaper if you shop around. I bought the 12/24V one --> D1S-2R-24, but a better choice would have been the D1S-VR-24 because of the SSR relay.
The other small parts (switches, connectors, jacks, box, ...) i bought in a local electronics store...
All together i went 6$ above my initial budget...
Here is the schematic for connecting all the parts...
And for those of you that like Pr0n...
The internal parts...
The outside of the box...
Here i mounted the fan to the door of the Q...
For those of you that would like to see the PID in action...
MOV_0143.mp4 video by BillieChillie - Photobucket@@AMEPARAM@@http://vid893.photobucket.com/player.swf?file=http://vid893.photobucket.com/albums/ac134/BillieChillie/MOV_0143.mp4@@AMEPARAM@@vid893@@AMEPARAM@@893@@AMEPARAM@@ac134/BillieChillie/MOV_0143@@AMEPARAM@@mp4 and MOV_0144.mp4 video by BillieChillie - Photobucket@@AMEPARAM@@http://vid893.photobucket.com/player.swf?file=http://vid893.photobucket.com/albums/ac134/BillieChillie/MOV_0144.mp4@@AMEPARAM@@vid893@@AMEPARAM@@893@@AMEPARAM@@ac134/BillieChillie/MOV_0144@@AMEPARAM@@mp4 the PID is in Autolearn mode.
Hope you enjoyed this read
Greetings Tom