coewar
Knows what a fatty is.
Holes and magnets and valves oh my!
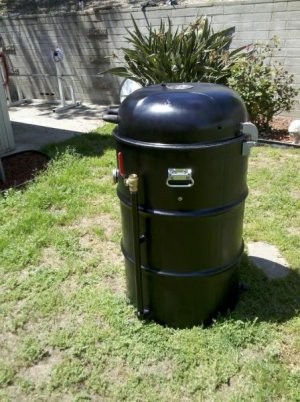
Hi guys.. thought to check in every now and then. I started on this thread in December and built a UDS and have been using it on average once a week since. Find my other posts to see pictures of my variations of the same smoker. Great thing about UDS is you can just change one and fix it without having to start over.
REGARDING AIR CONTROL - I have been using the pipes and ball valve. But I'm undoing that design because I want the intake to be evenly coming in so the coals burn all around, not just in the 1 area. Initially I drilled three 1 inch holes at bottom for intake (using a simple 1 inch hole saw with a pilot bit, no need for the step bit.) This fits exactly a 3/4 inch black iron nipple. On 2 of them I just put caps and undo when needed, and 1 of them I have a ball valve.
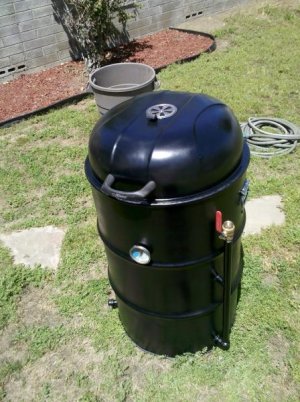
BUT I'M CHANGING THE DESIGN. I've been operating with those as intakes long enough now. Instead what I'm going to do (with same smoker) is plug up those 1 inch holes and instead drill smaller holes and use magnets. The reason for this is to be able to control the intake, but also allow the air intake to come in from all sides of the bottom. If only from 1 or 2 holes, then the charcoal tends to just burn in that area, and over long burns requires me to close one and open another port. The pipes that I have there get rusty. I usually leave smoker in garage, but sometimes I smoke in the rain (under covered deck) but the moisture in the air is enough to rust the pipes. Plus, it makes the smoker lighter.. as I move it around a lot.
LET'S DO SOME MATH. At the end of this message and also attached is an XLS spreadsheet with circle area calculations. It's showing how many and how big holes you'd need to do the same job as the 3/4 inch holes that are most common. Area of a circle is Radius times Radius times PI. (I'd write it differently if I had a piece of paper to show you.) Radius of course, if half the diameter. PI is ~3.14.
CenTech: Regarding your smoke taste issues.. DON'T GIVE UP! Simple things can make it REALLY YUMMY! FIRST THING YOU NEED TO DO.. is Season your smoker! (not sure I caught you indicating you did.) Rub it down with some cooking oil all over the inside, or much easier to spray PAM. Then light a full chimney of coals, and when they are lit, dump it in the smoker's fire basket. (YOU MUST USE A FIRE BASKET to cook in a barrel.) Let it burn for a bit, close it up and let the smoker sit at 350 degrees for at least 30 mins. Then you can extinguish by closing all intakes and exhaust.
AFTER YOU DID THAT.... Get a bag of plain charcoal briquettes, not the lump charcoal. (They are easier to learn with.) Dump maybe 1/3 of a large bag into the fire basket, UN-LIT!!! Then use newspapers and a charcoal chimney starter, and fill up the chimney JUST HALF WAY, no more! Light the chimney. WAIT WAIT WAIT for the coals in the chimney to finish burning flames so they are nice and white. THEN pour them on top of the un-lit coals in the smoker, place 1 or 2 CHUNKS of wood for your flavoring, QUICKLY CLOSE THE LID. By the way, put one wood piece on coals already let, and put the other piece on coals not quite lit yet; it will make for hours of hassle-free smoking. At this point maybe 75% of your intakes should be open, and 100% of your exhaust. When you are mentally ready") open the lid and put your food in, your food rack, etc, and close the lid. You probably want to cut your intake to 50%, but always just leave your exhaust at 100%. This configuration should easily allow you to smoke for 10+ hours without adding a single thing to the fire basket. Just controlling the air flow. I've done smokes with 1/3 to 1/2 a bag (depending on size of bag) for 14 hours. And I've also done them overnight several times. Learned from some mistakes, but have no worry about doing it. But I won't do that with a brisket.. that requires some attention during the day to make sure it doesn't get anywhere close to 250 degrees even.
open the lid and put your food in, your food rack, etc, and close the lid. You probably want to cut your intake to 50%, but always just leave your exhaust at 100%. This configuration should easily allow you to smoke for 10+ hours without adding a single thing to the fire basket. Just controlling the air flow. I've done smokes with 1/3 to 1/2 a bag (depending on size of bag) for 14 hours. And I've also done them overnight several times. Learned from some mistakes, but have no worry about doing it. But I won't do that with a brisket.. that requires some attention during the day to make sure it doesn't get anywhere close to 250 degrees even.
And by the way, start with a pork shoulder, not a brisket. Briskets (as Texans know) takes some practice. Pork shoulder can be totally messed up during cooking but can still be fixed and turn out super!
Now, Regarding exhaust, only the one 2inch hole at the top is needed. You can drill holes and other things in the lid or on the sides (like I did) but do the math to make sure you're at least providing enough circular area as a 2inch hole. I happen to have created a 3 inch hole on the side and have a little chimney pipe to create a nice draft which allows for more moisture (air inside smoker does not sit too long to dry out) and does a good job of never suffocating and able to run at high temps if I need it. (smoking chicken).
And here are the Circle Area calculations mentioned earlier:
Diameter - Radius - Pi - Area Inches squared - Number of holes - Total Area Inches squared - Notes
WITH THE 1 INCH HOLES AND THE 3/4 INCH PIPES AND VALVES, YOU END UP WITH THE 0.75 INCH DIAMETER
0.75 0.375 3.14 0.44 3 1.33 Old Intakes using 3/4 inch pipes
0.75 0.375 3.14 0.44 2 0.88 This represents closing 1 hole, leaving the other 2 fully open.
0.75 0.375 3.14 0.44 1.5 0.66 one open and ball valve half way - ideal intake for 225 cooking - Results in about 0.66 inches sq.
0.75 0.375 3.14 0.44 1.25 0.55 This represents 1 hole open and the ball valve at like 25%.
LET'S SAY WE DRILL 1/2 INCH HOLES AND USE MAGNETS INSTEAD OF THE EXPENSIVE PIPES AND VALVES
0.5 0.25 3.14 0.20 7 1.37 With 1/2 inch holes (no pipes), it would take 7 to at least get as much as 3 of the 3/4 inch holes.
0.5 0.25 3.14 0.20 8 1.57 7 holes is goofy to leave, so let's make it 8 holes. 2 holes on 4 sides of the bottom. 2 inches off the ground
0.5 0.25 3.14 0.20 4 0.79 With magnets, 4 completely covered holes is a tad more intake than the 1 and half of the 3/4 inch holes
0.5 0.25 3.14 0.20 3 0.59 Covering 1 more hole completely is just a tad more than the 1 and 25%.
0.5 0.25 3.14 0.20 3.5 0.69 So maybe you'll have a reason to cover a hole 50%. That should be easy with a magnet.
OR MAYBE YOU PREFER FINER CONTROL. SAY 3/8 INCH, THAT'S 0.375 INCHES
0.375 0.1875 3.14 0.11 12 1.33 You need EXACTLY 4 times as many holes. So maybe you do 4 sets of 3 holes, or 3 sets of 4 holes.
0.375 0.1875 3.14 0.11 6 0.66 Covering half of these holes gives you the same intake as the one 3/4 open and ball valve half way. But you still maintain intake coming in evenly through the bottom.
JUST FOR COMPARISON, HERE IT IS FOR 1/4 INCH HOLES
0.25 0.125 3.14 0.05 27 1.33 WAY TOO MANY HOLES.
0.25 0.125 3.14 0.05 13 0.64
Why so many smaller holes in general, you may ask? Because you're absolutely right about it being hard to find just the right partial coverage of a hole with a magnet. But if you have small holes, it's easy to cover a hole completely. If you have a large square or rectangular magnet, you can just place it over neighboring holes to cover more than one. And I'm talking about one of those flexible magnets, like you might put on your refrigerator. Maybe some business send them to you for advertisement. They are usually not rigid magnets.
Hi guys.. thought to check in every now and then. I started on this thread in December and built a UDS and have been using it on average once a week since. Find my other posts to see pictures of my variations of the same smoker. Great thing about UDS is you can just change one and fix it without having to start over.
REGARDING AIR CONTROL - I have been using the pipes and ball valve. But I'm undoing that design because I want the intake to be evenly coming in so the coals burn all around, not just in the 1 area. Initially I drilled three 1 inch holes at bottom for intake (using a simple 1 inch hole saw with a pilot bit, no need for the step bit.) This fits exactly a 3/4 inch black iron nipple. On 2 of them I just put caps and undo when needed, and 1 of them I have a ball valve.
BUT I'M CHANGING THE DESIGN. I've been operating with those as intakes long enough now. Instead what I'm going to do (with same smoker) is plug up those 1 inch holes and instead drill smaller holes and use magnets. The reason for this is to be able to control the intake, but also allow the air intake to come in from all sides of the bottom. If only from 1 or 2 holes, then the charcoal tends to just burn in that area, and over long burns requires me to close one and open another port. The pipes that I have there get rusty. I usually leave smoker in garage, but sometimes I smoke in the rain (under covered deck) but the moisture in the air is enough to rust the pipes. Plus, it makes the smoker lighter.. as I move it around a lot.
LET'S DO SOME MATH. At the end of this message and also attached is an XLS spreadsheet with circle area calculations. It's showing how many and how big holes you'd need to do the same job as the 3/4 inch holes that are most common. Area of a circle is Radius times Radius times PI. (I'd write it differently if I had a piece of paper to show you.) Radius of course, if half the diameter. PI is ~3.14.
CenTech: Regarding your smoke taste issues.. DON'T GIVE UP! Simple things can make it REALLY YUMMY! FIRST THING YOU NEED TO DO.. is Season your smoker! (not sure I caught you indicating you did.) Rub it down with some cooking oil all over the inside, or much easier to spray PAM. Then light a full chimney of coals, and when they are lit, dump it in the smoker's fire basket. (YOU MUST USE A FIRE BASKET to cook in a barrel.) Let it burn for a bit, close it up and let the smoker sit at 350 degrees for at least 30 mins. Then you can extinguish by closing all intakes and exhaust.
AFTER YOU DID THAT.... Get a bag of plain charcoal briquettes, not the lump charcoal. (They are easier to learn with.) Dump maybe 1/3 of a large bag into the fire basket, UN-LIT!!! Then use newspapers and a charcoal chimney starter, and fill up the chimney JUST HALF WAY, no more! Light the chimney. WAIT WAIT WAIT for the coals in the chimney to finish burning flames so they are nice and white. THEN pour them on top of the un-lit coals in the smoker, place 1 or 2 CHUNKS of wood for your flavoring, QUICKLY CLOSE THE LID. By the way, put one wood piece on coals already let, and put the other piece on coals not quite lit yet; it will make for hours of hassle-free smoking. At this point maybe 75% of your intakes should be open, and 100% of your exhaust. When you are mentally ready
open the lid and put your food in, your food rack, etc, and close the lid. You probably want to cut your intake to 50%, but always just leave your exhaust at 100%. This configuration should easily allow you to smoke for 10+ hours without adding a single thing to the fire basket. Just controlling the air flow. I've done smokes with 1/3 to 1/2 a bag (depending on size of bag) for 14 hours. And I've also done them overnight several times. Learned from some mistakes, but have no worry about doing it. But I won't do that with a brisket.. that requires some attention during the day to make sure it doesn't get anywhere close to 250 degrees even.And by the way, start with a pork shoulder, not a brisket. Briskets (as Texans know) takes some practice. Pork shoulder can be totally messed up during cooking but can still be fixed and turn out super!
Now, Regarding exhaust, only the one 2inch hole at the top is needed. You can drill holes and other things in the lid or on the sides (like I did) but do the math to make sure you're at least providing enough circular area as a 2inch hole. I happen to have created a 3 inch hole on the side and have a little chimney pipe to create a nice draft which allows for more moisture (air inside smoker does not sit too long to dry out) and does a good job of never suffocating and able to run at high temps if I need it. (smoking chicken).
And here are the Circle Area calculations mentioned earlier:
Diameter - Radius - Pi - Area Inches squared - Number of holes - Total Area Inches squared - Notes
WITH THE 1 INCH HOLES AND THE 3/4 INCH PIPES AND VALVES, YOU END UP WITH THE 0.75 INCH DIAMETER
0.75 0.375 3.14 0.44 3 1.33 Old Intakes using 3/4 inch pipes
0.75 0.375 3.14 0.44 2 0.88 This represents closing 1 hole, leaving the other 2 fully open.
0.75 0.375 3.14 0.44 1.5 0.66 one open and ball valve half way - ideal intake for 225 cooking - Results in about 0.66 inches sq.
0.75 0.375 3.14 0.44 1.25 0.55 This represents 1 hole open and the ball valve at like 25%.
LET'S SAY WE DRILL 1/2 INCH HOLES AND USE MAGNETS INSTEAD OF THE EXPENSIVE PIPES AND VALVES
0.5 0.25 3.14 0.20 7 1.37 With 1/2 inch holes (no pipes), it would take 7 to at least get as much as 3 of the 3/4 inch holes.
0.5 0.25 3.14 0.20 8 1.57 7 holes is goofy to leave, so let's make it 8 holes. 2 holes on 4 sides of the bottom. 2 inches off the ground
0.5 0.25 3.14 0.20 4 0.79 With magnets, 4 completely covered holes is a tad more intake than the 1 and half of the 3/4 inch holes
0.5 0.25 3.14 0.20 3 0.59 Covering 1 more hole completely is just a tad more than the 1 and 25%.
0.5 0.25 3.14 0.20 3.5 0.69 So maybe you'll have a reason to cover a hole 50%. That should be easy with a magnet.
OR MAYBE YOU PREFER FINER CONTROL. SAY 3/8 INCH, THAT'S 0.375 INCHES
0.375 0.1875 3.14 0.11 12 1.33 You need EXACTLY 4 times as many holes. So maybe you do 4 sets of 3 holes, or 3 sets of 4 holes.
0.375 0.1875 3.14 0.11 6 0.66 Covering half of these holes gives you the same intake as the one 3/4 open and ball valve half way. But you still maintain intake coming in evenly through the bottom.
JUST FOR COMPARISON, HERE IT IS FOR 1/4 INCH HOLES
0.25 0.125 3.14 0.05 27 1.33 WAY TOO MANY HOLES.
0.25 0.125 3.14 0.05 13 0.64
Why so many smaller holes in general, you may ask? Because you're absolutely right about it being hard to find just the right partial coverage of a hole with a magnet. But if you have small holes, it's easy to cover a hole completely. If you have a large square or rectangular magnet, you can just place it over neighboring holes to cover more than one. And I'm talking about one of those flexible magnets, like you might put on your refrigerator. Maybe some business send them to you for advertisement. They are usually not rigid magnets.
Attachments
Last edited: