
If you love making pizza, and don’t have the resources for a wood fired pizza oven, then the Franken Weber Pizza Kettle just may be the perfect option for you. With its ability to get stone temps up to over 700 degrees, the propane powered FrankenWeber can cook pizzas in under four minutes if you like. You’ll get the same wonderful char on your pizza crusts like you would get in a wood fired oven that are simply not possible in a home gas oven, or even many commercial pizza ovens. I’m going to walk you through the entire process, including some key discoveries I made along the way that push this design concept to its absolute most efficient, along with lowering costs to a bare minimum. Total cost for parts and donor kettle was less than $200.00.
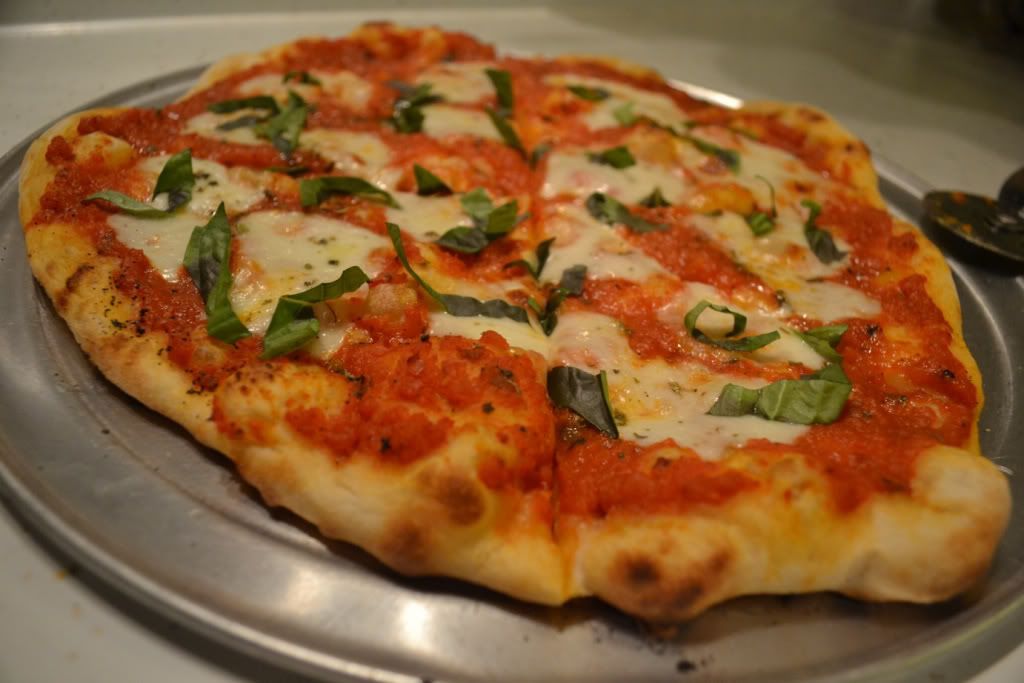
Here’s some pics of my pies that came out of the FrankenWeber:


1. Introduction – In the Beginning:
A few years ago, in my search to find a portable, inexpensive alternative to wood fired pizza oven, a Google search led me to “The Little Black Egg.” Do one for yourself, and you’ll find plenty of threads in a particular pizza board, in addition to YouTube Videos. As I began researching this wonderful cooker and its potential, I saw some design issues that concerned me, however. Some creative thinking led me to solutions, and the FrankenWeber was born. With a few simple tools along with the modifications I made to the original design, I was cranking out world class pizzas from the starting gate, and you can too. If you are not handy with tools and or don’t have the power tools listed, you can enlist the help of a friend who does, perhaps with the promise they’ll receive free pizzas for a month. If you don’t have a friend with power tools, find a handyman who does and show him this tutorial. (With the promise of free pizza, of course.)
So if you’re wondering what all these modifications I made were, here they are:
2. What You’ll Need to Get Started:
The hardware:
One 22 inch Weber Kettle (you can search for a used one on Craigslist. Just make sure it has no dents that might affect the seal of the lid.) Around $50
One Red Sky Pizza Grilling Stone for a 22 inch Weber Kettle (about $55)
One 18 inch aluminum pizza pan: under $10
One 5 inch long 1/8 inch hex screw: under: $1.00
One hex nut to fit screw: under $1.00
Two 1 inch metal washers with 18 inch holes: under $1.00
An infrared handheld Thermometer that reads up to 1000 degrees (less than $50)
One Bayou Classic SP10 High-Pressure Outdoor Gas Cooker ($58 on Amazon)
One 8 or 9 inch stainless steel bowl
Sand
One full propane tank
Tools:
High powered drill with 1/8 inch metal bit
Angle grinder or jigsaw
Screwdriver
Masking or painters tape
Measuring tape
Black marker
3. Step one: Building the FrankenWeber Pizza Kettle:
Remove the charcoal and cooking grate from the kettle, but keep the cooking grate as you will need it to for the stone to rest on. Take the bottom of the kettle and turn it upside down, then mark a perfect 10 inch circle directly in the center of the bottom. Cut the circle out carefully using your jigsaw or angle grinder.
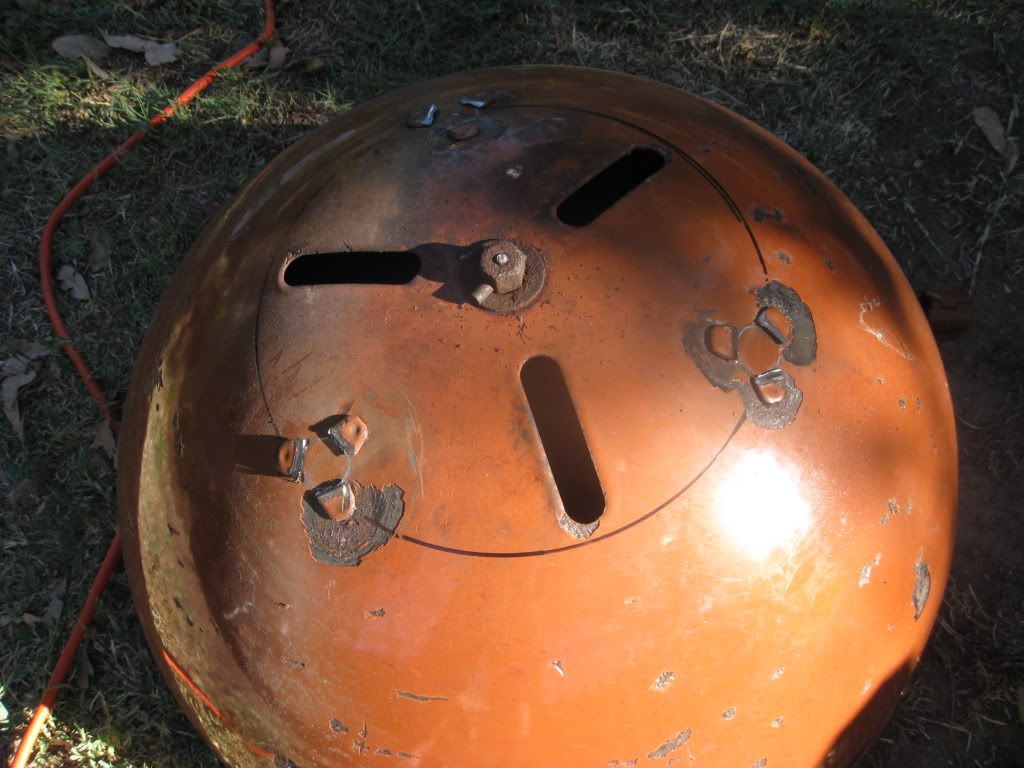
This is what it should look like after you’ve cut it out:

This opening is where you will position the kettle directly over the propane burner.
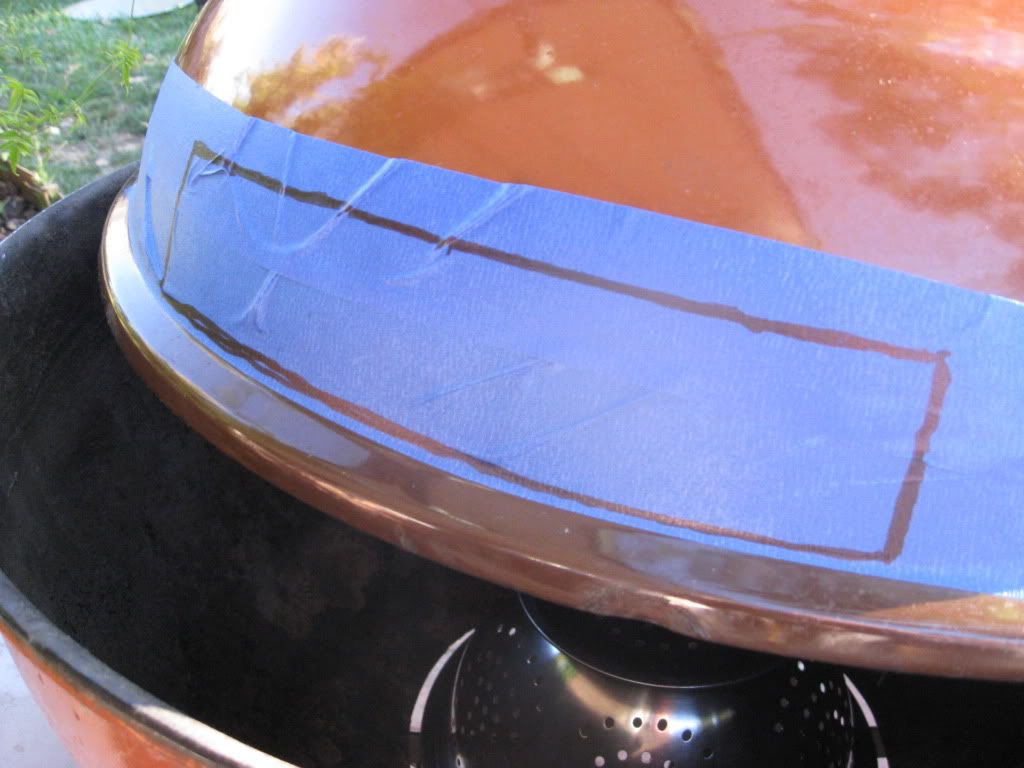
Cutting the front vent opening:
Next, take your masking tape and cover a perfect rectangular area on the bottom front of the lid. You want enough tape to cover an approximate area about 2.5 x 10 inches. Now take your black marker and outline a rectangle that is exactly 9 inches long by two inches high, with the bottom line sitting directly over the lip of the lid, like so:
Now take your jigsaw or angle grinder, and cut out the opening. It should look like this:
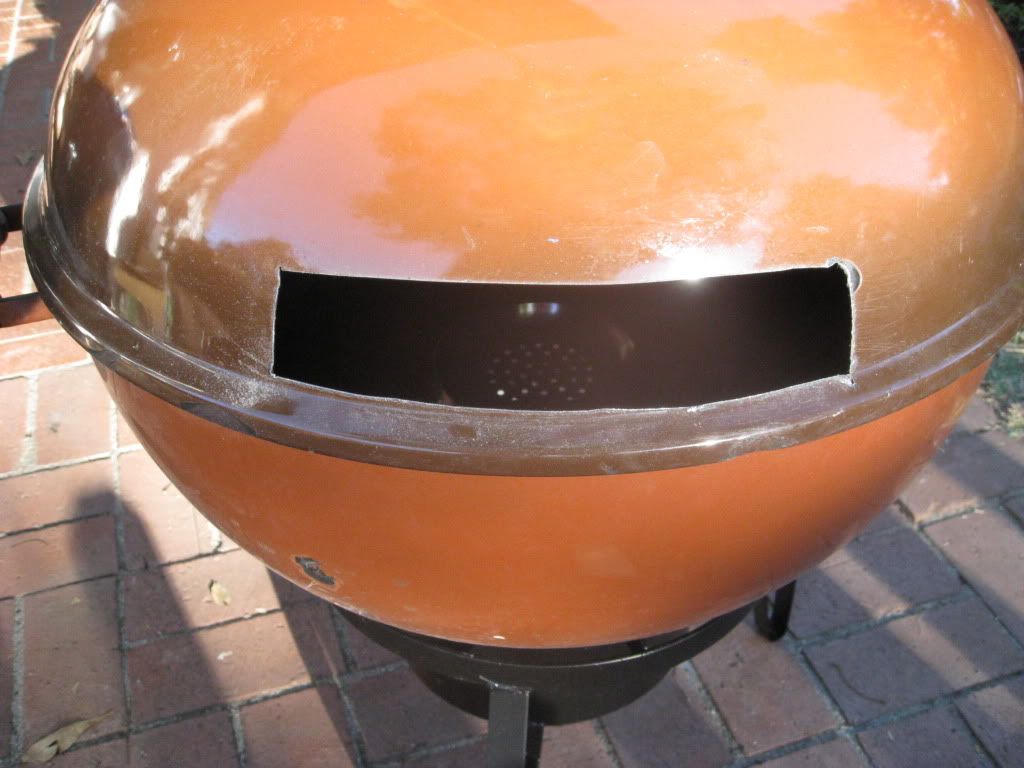
It’s important to note that this is a VENT, and as such, is not meant to be used to put your pizza in the kettle. This vent helps to force hot air over the top of the pizza and out the front. If you make the vent any larger, you will compromise the convection effect of the design and your pizzas will suffer.
Now that you’ve made the cuts with your power tools, the good news is the hard part is over! Grab a beer and relax knowing that you are getting close to completing your FrankenWeber Pizza Kettle and delicious homemade pizza is definitely in your future.
Lowering the ceiling of the lid:
The purpose of lowering the ceiling of the lid is to help equalize the heat throughout the inner part of the kettle lid, which helps cook the top of the pie as evenly as the bottom. To do this, remove the screw in the handle on the lid. Now take your drill with the 1/8 inch bit, and position it through the hole, and keeping it straight, drill straight through the lid. After you’ve done this, drill another hole through the middle of the pizza pan. One this is done, take the long screw and slide it through the first washer, and put it all the way through the opening. Now take your lid, and while holding the lid upright vertically, take the pizza pan and align the opening of the pan and push the pan tightly against the wall of the lid. Then take your washer, put it over the screw, and fasten the hex nut to the screw and tighten till the pan is completely flush and fits snugly against the inner part of the lid, like so:

4. Assembling the kettle and getting ready to cook:
Take the stainless steel bowl, and fill it about ½ way with sand. This acts as a heat deflector and helps to heat the stone more evenly. Position the bowl directly on the center of the propane burner, and take the bottom kettle assembly and place it over the steel bowl:

Next, put the cooking grate in the kettle, and put the Red Sky stone on the cooking grate, with the “D” cut facing away from the front, like so:

Next, place the lid on the kettle, with the vent positioned in front, facing away from the “D: cut on the stone. And that’s it – you are ready to fire up your FrankenWeber Pizza Kettle for its maiden voyage!
At this point, I suggest you do a test fire so you get a feel for stone temps. Hook up your propane burner to the tank, open the propane handle about ½ way, then open the valve on the connector hose about ½ turn, then ignite. It should take about 15 mins for the stone to come up to temp. Point your infrared thermometer at various spots on the stone, both back and front. If you are using all purpose flour in your dough, or store bought dough, you want a stone temp in the 575-625 range, no hotter or your crust will burn. You may also notice the temp in the back of the stone is hotter than the front – this is normal, and is compensated for by quickly lifting the lid (Be sure to have a welding or well insulated glove on) then rotating the pie ½ a turn about 2 times during the cooking process. Here’s a video demonstrating this technique on the original black egg build:
[ame="http://www.youtube.com/watch?v=WtXTMufUMh0"]The Little Black Egg - YouTube[/ame]
If you are using “00” flour, you can crank up the heat for a stone temp up to 750+ degrees.
A few additional things you’ll want if you don’t have them are:
Wooden pizza peel – do not get a metal peel- they are meant for taking pizzas out of ovens, not putting them in. Don’t ask me how I found this out!
Semolina flour: This is the perfect “lubricant” to help get your pizza off the peel. Because it is so fine, it does not affect the flavor and texture profile the way cornmeal does, and is a lot more slippery than cornmeal.
Finally, if you want some additional pizza making tips, you can check out my tutorial on pizza making HERE.
I’m really looking forward to seeing some new Brethren-created FrankenWeber Pizza kettles in action! :thumb:

Here’s some pics of my pies that came out of the FrankenWeber:
1. Introduction – In the Beginning:
A few years ago, in my search to find a portable, inexpensive alternative to wood fired pizza oven, a Google search led me to “The Little Black Egg.” Do one for yourself, and you’ll find plenty of threads in a particular pizza board, in addition to YouTube Videos. As I began researching this wonderful cooker and its potential, I saw some design issues that concerned me, however. Some creative thinking led me to solutions, and the FrankenWeber was born. With a few simple tools along with the modifications I made to the original design, I was cranking out world class pizzas from the starting gate, and you can too. If you are not handy with tools and or don’t have the power tools listed, you can enlist the help of a friend who does, perhaps with the promise they’ll receive free pizzas for a month. If you don’t have a friend with power tools, find a handyman who does and show him this tutorial. (With the promise of free pizza, of course.)
So if you’re wondering what all these modifications I made were, here they are:
- The original Little Black Egg(LBE) is made from an 18 inch Weber kettle. This is too small for me, so I use a 22 inch kettle that will cook pies up to 16 inches.
- The LBE utilizes firebrick as a stone surface. Firebrick is a great heat conductor, but it also takes a LONG time to heat up which means rapid propane depletion – I’ve heard that using the firebrick on an 18inch LBE will get you about 4 pizza cooks out of one full propane tank. That’s just freaking crazy expensive! I solved this easily using the Red Sky Grilling stone, which is only ½ an inch thick, and designed to withstand temps of over 2200 degrees. Even better, it has a “D” shape which helps create a convection effect by helping to push hot air upwards and over the pie as it is cooking.
- I also found that many were having issues with getting the top of the pizza to cook as evenly as the bottom when using an 22 inch kettle. I solved this problem by lowering the ceiling of the lid by mounting a pizza pan to the inside of the lid.
2. What You’ll Need to Get Started:
The hardware:
One 22 inch Weber Kettle (you can search for a used one on Craigslist. Just make sure it has no dents that might affect the seal of the lid.) Around $50
One Red Sky Pizza Grilling Stone for a 22 inch Weber Kettle (about $55)
One 18 inch aluminum pizza pan: under $10
One 5 inch long 1/8 inch hex screw: under: $1.00
One hex nut to fit screw: under $1.00
Two 1 inch metal washers with 18 inch holes: under $1.00
An infrared handheld Thermometer that reads up to 1000 degrees (less than $50)
One Bayou Classic SP10 High-Pressure Outdoor Gas Cooker ($58 on Amazon)
One 8 or 9 inch stainless steel bowl
Sand
One full propane tank
Tools:
High powered drill with 1/8 inch metal bit
Angle grinder or jigsaw
Screwdriver
Masking or painters tape
Measuring tape
Black marker
3. Step one: Building the FrankenWeber Pizza Kettle:
Remove the charcoal and cooking grate from the kettle, but keep the cooking grate as you will need it to for the stone to rest on. Take the bottom of the kettle and turn it upside down, then mark a perfect 10 inch circle directly in the center of the bottom. Cut the circle out carefully using your jigsaw or angle grinder.
This is what it should look like after you’ve cut it out:
This opening is where you will position the kettle directly over the propane burner.
Cutting the front vent opening:
Next, take your masking tape and cover a perfect rectangular area on the bottom front of the lid. You want enough tape to cover an approximate area about 2.5 x 10 inches. Now take your black marker and outline a rectangle that is exactly 9 inches long by two inches high, with the bottom line sitting directly over the lip of the lid, like so:
Now take your jigsaw or angle grinder, and cut out the opening. It should look like this:
It’s important to note that this is a VENT, and as such, is not meant to be used to put your pizza in the kettle. This vent helps to force hot air over the top of the pizza and out the front. If you make the vent any larger, you will compromise the convection effect of the design and your pizzas will suffer.
Now that you’ve made the cuts with your power tools, the good news is the hard part is over! Grab a beer and relax knowing that you are getting close to completing your FrankenWeber Pizza Kettle and delicious homemade pizza is definitely in your future.
Lowering the ceiling of the lid:
The purpose of lowering the ceiling of the lid is to help equalize the heat throughout the inner part of the kettle lid, which helps cook the top of the pie as evenly as the bottom. To do this, remove the screw in the handle on the lid. Now take your drill with the 1/8 inch bit, and position it through the hole, and keeping it straight, drill straight through the lid. After you’ve done this, drill another hole through the middle of the pizza pan. One this is done, take the long screw and slide it through the first washer, and put it all the way through the opening. Now take your lid, and while holding the lid upright vertically, take the pizza pan and align the opening of the pan and push the pan tightly against the wall of the lid. Then take your washer, put it over the screw, and fasten the hex nut to the screw and tighten till the pan is completely flush and fits snugly against the inner part of the lid, like so:
4. Assembling the kettle and getting ready to cook:
Take the stainless steel bowl, and fill it about ½ way with sand. This acts as a heat deflector and helps to heat the stone more evenly. Position the bowl directly on the center of the propane burner, and take the bottom kettle assembly and place it over the steel bowl:
Next, put the cooking grate in the kettle, and put the Red Sky stone on the cooking grate, with the “D” cut facing away from the front, like so:
Next, place the lid on the kettle, with the vent positioned in front, facing away from the “D: cut on the stone. And that’s it – you are ready to fire up your FrankenWeber Pizza Kettle for its maiden voyage!
At this point, I suggest you do a test fire so you get a feel for stone temps. Hook up your propane burner to the tank, open the propane handle about ½ way, then open the valve on the connector hose about ½ turn, then ignite. It should take about 15 mins for the stone to come up to temp. Point your infrared thermometer at various spots on the stone, both back and front. If you are using all purpose flour in your dough, or store bought dough, you want a stone temp in the 575-625 range, no hotter or your crust will burn. You may also notice the temp in the back of the stone is hotter than the front – this is normal, and is compensated for by quickly lifting the lid (Be sure to have a welding or well insulated glove on) then rotating the pie ½ a turn about 2 times during the cooking process. Here’s a video demonstrating this technique on the original black egg build:
[ame="http://www.youtube.com/watch?v=WtXTMufUMh0"]The Little Black Egg - YouTube[/ame]
If you are using “00” flour, you can crank up the heat for a stone temp up to 750+ degrees.
A few additional things you’ll want if you don’t have them are:
Wooden pizza peel – do not get a metal peel- they are meant for taking pizzas out of ovens, not putting them in. Don’t ask me how I found this out!
Semolina flour: This is the perfect “lubricant” to help get your pizza off the peel. Because it is so fine, it does not affect the flavor and texture profile the way cornmeal does, and is a lot more slippery than cornmeal.
Finally, if you want some additional pizza making tips, you can check out my tutorial on pizza making HERE.
I’m really looking forward to seeing some new Brethren-created FrankenWeber Pizza kettles in action! :thumb:
 By all means, please enlighten me. I'm all ears...