Wine Barrel Smoker

N

NU2QN

Guest
I had a job interview today and when I got home, my 60 qt. steamer basket was waiting for me. I wasn't planning on starting until Friday but I couldn't help myself. I started where most finish off, the charcoal basket. That is what the steamer basket is for.

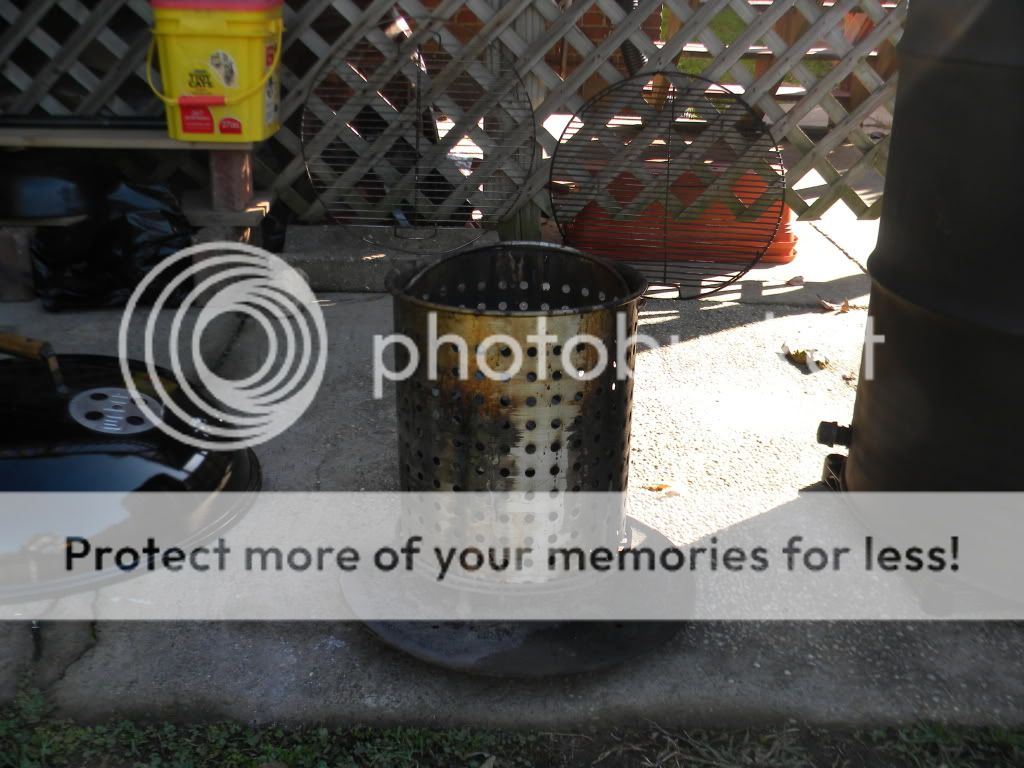
Here we go. I didn't like the height of the basket so I cut off the rivets holding the handle and then cut three inches off the top. I drilled an additional set of holes around the bottom and drilled new holes to attach the handle.

The first pic shows all the components ready to be assembled.
IMG-20120222-00131.jpg
The handle reattached to the basket.
IMG-20120222-00132.jpg
I attached a 16" pizza pan as an ash catcher.
IMG-20120222-00133.jpg
It's almost too purty to burn, isn't it?

My helper (youngest son) is coming to visit this weekend. We will begin working on the barrel itself on Friday. I will continue to post pics as I work on the project so stay tuned.
 
nice work. I did the same thing with my drum until I was able to get some expanded metal. Those baskets work great. Mine was a lot smaller but had some good cooks with it. Since then I have cut the basket into different sections to have charcoal rings ala WSM style for my smokey joe's and smokey joe tall boy.

148.jpg
 
Lookin good there Mon! Me lookin forward for more:grin:
 
Day 2 & 3

Yesterday after I got off work, my plan was to get the holes marked and drilled so this is how it went.

I guessed where the center of each stave was and marked a virticle line on the four middle bands. Then I marked the spot for the hole on each of the verticle lines at half the width of the band, measured not guessed on this step. I started drilling and this is when I discovered again how important the right tool for the right job was. After a quick trip to the hardware store, a 1/8" and 3/16" titanium drill bit the work continued. I started each hole with the smaller bit then i followed behind with the larger bit making sure I only drilled through the metal of the band and not into the wood.

The picture shows the holes marked. I forgot to get a picture after the drilling was done.
IMG-20120223-00135.jpg

Friday morning began with some Xbox with my son before getting started on the barrel. We started sanding around 11. Note to self, next time sand the bands, paint the bands, then sand the wood. I am no Picaso when it comes to painting.

This pic shows my son helping me out with the sanding
IMG-20120224-00136.jpg

This is the barrel and bands sanded ready for paint.
IMG-20120224-00138.jpg

My original plan was to use a bronze colored spray paint for the bands. I ended up buying a quart of Rustoleum Semi-Gloss Black and brushed it on. I am happy with the decision, the brush strokes at some petina to the finish.

Here is the barrel with the bands painted and the screws installed.
IMG-20120224-00140.jpg

Tomorrow we will be hitting the wood with the sander again to remove the paint screw ups. Then we will cut the lid, install the hinges, chains, and cooking grate.

More pictures to follow.
 
This looks great, but I have an ignorant question.

How are you planning to keep this from catching fire? :confused:
 
This looks great, but I have an ignorant question.

How are you planning to keep this from catching fire? :confused:

The fire basket sits about 3 inches off the bottom and there is a steel pizza pan underneath. There is about three inches clearance around the fire basket so there shouldnt be any problem there. I don't plan on cooking in this over 275. Worse case scenario is I might have to put water in the bottom during the cook. I don't expect any problems as other people have done the same thing.
 
The fire basket sits about 3 inches off the bottom and there is a steel pizza pan underneath. There is about three inches clearance around the fire basket so there shouldnt be any problem there. I don't plan on cooking in this over 275. Worse case scenario is I might have to put water in the bottom during the cook. I don't expect any problems as other people have done the same thing.

Sounds very cool! Have you considered maybe putting about an inch of sand or cat litter in the bottom?
 
Day 4

I got sruck at a track meet yesterday and didn't get a chance to work on the smoker. I figured I could get a couple hours today before Daytona. Thanks to the rain in Daytona, I had some extra time.

So I started this morning by cutting off the top. I used the base of my jigsaw as a guide and ran it along the edge of upper middle band. I had a little screw up but nothing major. A little advice for those who are going to build one, start in one spot with your cut and go all the way around the barrel to where you started. Don't cut half way and then go the other direction. The bands aren't exactly level. They are close.
IMG-20120226-00141.jpg
IMG-20120226-00143.jpg

I have seen other Wine Barrel Smokers that after years of poor care, the staves tend to warp and move, looking like the barrel could use some serious orthodontic care. To counter this problem, I took and extra barrel hoop, cut the rivets, and resized and welded the hoop to fit inside the lip of the lower portion of the barrel. I screwed the hoop into place. By doing this it actually served two more purposes, attaching the chains, and the L-brackets for the cooking grate.
IMG-20120226-00145.jpg
IMG-20120226-00147.jpg
IMG-20120226-00148.jpg
IMG-20120226-00150.jpg

If the weather holds out, I should be able to do the final sanding tomorrow and begin staining and installing the external hardware on Tuesday with a trial burn in on Wednesday.
 
awesome work. this is really interesting. can't wait to see how it cooks!
 
that is sooo coool!!! does it pass any of the wood/wine flavor while cooking?
 
that is sooo coool!!! does it pass any of the wood/wine flavor while cooking?

I have been told that it does. However once I get a few cooks in it, the inside would be seasoned just like in any other somoker thus sealing in the wine flavor. I have a cure for that though, buy more wine barrels and cut them up for wine infused oak chunks. :becky:
 
Back
Top